Scrap Gardening for Beginners
Scrap gardening is great for beginners who are wanting to experiment with their first garden and for those who just do not have room for a large garden in their yard. It is also a great way to save money on fresh food!
By Savannah Kohler, Leadership in Urban Agriculture Internship, 2020
An estimated 1/3 of all food that was made for consumption, ends up as waste instead. (1) Along with composting, scrap gardening is one of many strategies used world-wide to help with the reduction of food waste. While eating a higher quality diet is related to less cropland waste, it does have a negative association with food waste. (2) By taking the time to turn some of our kitchen scraps into a small scrap garden, we are doing our part in helping to provide a sustainable food system.
Scrap gardening is great for beginners who are wanting to experiment with their first garden and for those who just do not have room for a large garden in their yard. It is also a great way to save money on fresh food!
How is this done?
While each plant may vary in the amount of water used, the length cut of the scraps, and the amount of time it takes to regrow, it is all still remarkably easy and very much achievable! To begin, you will need for your plants to grow roots. See below for instructions.
What plants can I regrow?
You can regrow most of your veggies and fruits, but not all. Here are some examples of popular options that you can regrow and how to do it.
GREEN ONIONS: Cut off the top of the plant and keep the end that grows roots. Plant it in potting soil and place it in a well-lit room. Soon, the green onions will begin to grow back, and you can snip them off the plant and use them as needed.
CELERY: Cut the stalk, leaving about two inches at the bottom. Place the two-inch-long end in a bowl of very shallow water. When leaves begin to grow on top, you can move into potting soil and watch it grow.
ROMAINE LETTUCE: Cut the lettuce, leaving about two inches at the bottom. Place the two-inch-long end in a shallow bowl of water. As leaves grow, you may eat them.
POTATOES: Wait until your potato is starting to sprout. When it does, cut the potato in slices around the sprouts. Plant in deep soil with the eye facing up. Cover the potato entirely with soil.
HERBS: Pick most leaves from the stem, while leaving the only top few remaining. Place the stems in a glass of water. Replace the water every few days. Plant stems in soil once they have grown their roots.
Helpful Links:
https://www.diyncrafts.com/4732/repurpose/25-foods-can-re-grow-kitchen-scraps
References
Anastasia M, Alexandru J, Liliana S(C. Studies on the use of vegetable scraps. https://ibn.idsi.md/ro/vizualizare_articol/72422. Published February 20, 2019. Accessed July 27, 2020.
Conrad Z, Niles MT, Neher DA, Roy ED, Tichenor NE, Jahns L. Relationship between food waste, diet quality, and environmental sustainability. Plos One. 2018;13(4). doi:10.1371/journal.pone.0195405
Skullcap and Mullein for Health and Wellness
Learn how skullcap and mullein can be grown and used for therapeutic benefits!
By Libby Landes, Leadership in Urban Agriculture Internship, Fall II 2020
SKULLCAP
Scutellaria lateriflora
Parts used | Aboveground parts.
Nutrients | Calcium, iron, magnesium, manganese, phosphorus, potassium, selenium, zinc, vitamins B1, B2, B3, and C.
Therapeutic uses | Aids sleep, improves circulation, and strengthens the heart muscle. Relieves muscle cramps, pain, spasms, and stress. Good for anxiety, fatigue, cardiovascular disease, headache, hyperactivity, nervous disorders, and rheumatism. Known to be useful in treating barbiturate addiction and drug withdrawal.
Origins | The American Skullcap is a member of the mint family and native to eastern North America. The name Scutellaria refers to the helmetlike or skullcaplike form of each flower. Lateriflora, meaning “flowering on the side,” reveals that the skullcap’s blooms grow along just one side of its stalk.
Growing habits and cultivation | Skullcap is a perennial, 1 to 3 feet tall, that is found in the wetlands, riverbanks, and marshes in much of North America. It likes a relatively rich, moist but acidic soil and is propagated by seeds or cuttings.
Actions | Compounds in skullcap may bind to a GABA receptor in the brain responsible for modulating anxiety. Skullcap also contains the amino acid glutamine, which provides both sedative and anxiety-fighting effects.
How to use | Skullcap may be ingested orally through capsule, alcohol tinctures, or teas. Some herbal experts may recommend tinctures of the fresh plant to capture more of the healing compounds lost in drying the plant. When smoked, skullcap enters the bloodstream more quickly than other forms of consumption for quick anxiety relief.
Precautions | Drowsiness may result from this sedative herb.
MULLEIN
Verbascum thapsus
Part used | Leaves & flowers.
Nutrients | Calcium, iron, magnesium, phosphorus, potassium, selenium, zinc, vitamins B1, B2, B3, and C.
Therapeutic uses | Acts as a laxative, painkiller, and sleep aid. Clears congestion, soothes inflammation. Taken internally, aids in getting rid of warts. Useful for asthma, bronchitis, difficulty breathing, earache, hay fever, and swollen glands. In past years, research has shown that mullein kills disease-causing bacteria.
Origins | The name mullein may come from the Latin word mollis, which means “soft”, a reference to the plant’s velvety texture. European settlers introduced mullein into North America. In the late 1800s, doctors prescribed mullein for the cough and congestion associated with tuberculosis and other respiratory infections such as laryngitis, whooping cough, influenza, and asthma.
Growing habits and cultivation | Mullein is now found throughout the U.S. and Canada, in dry gravelly or sandy soils along roads and dry fields. Easily grown from seed on the edge of a garden among the other weeds, especially in sandy or rocky soil.
Actions | Mullein is known for its tissue-coating properties as well as anti-inflammatory, antiviral, and antibacterial effects.
How to use | Mullein tea has been used for respiratory problems and touted for its ability to soothe irritated membranes, relieve congestion, and break up phlegm. Infusions of the flower may be dabbed on the skin to heal sores, burns, and infections. It may also be made into a tincture or infused in oil. Mullein has been known to be a base herb in smoking preparations as well.
Precautions | Aside from the seeds, mullein is thought to be safe and well-tolerated.
WORKS CITED
Johnson, R., Foster, S. and Weil, A., 2014. National Geographic Guide To Medicinal Herbs. Washington, D.C.: National Geographic.
Brassica Pests: Solutions (Part 2 of 2)
Once you have identified which pest is attacking your brassica crops, then you can work towards managing the problem. In this case, most of the treatments are very similar for all 3 kinds of caterpillars.
By Rebecca Halcomb, Leadership in Urban Agriculture Internship, Fall II 2020
Once you have identified which pest is attacking your brassica crops, then you can work towards managing the problem. In this case, most of the treatments are very similar for all 3 kinds of caterpillars. There are a few specific solutions, but I’ll note those below:
Row Covers: Cover brassica crops with floating row cover or screen cover from when you plant to when you harvest to keep the butterflies and moths off. You should still regularly inspect though. You can also use pantyhose on cabbage heads, and those will grow with the plant and let enough air, sunlight, and moisture in.
Hand-picking: It can be time-consuming and they can be easy to miss, especially the 2 green species. They like to hide on the underside of the leaves, and blend in with the leaf veins. It’s actually much easier to see their dark green frass (poop) than it is to see them. You can drown them in soapy water once you pick them off.
Use Predators: Hang birdhouses in or near the garden or let the chickens into the garden temporarily once the plants are hardy enough, and they will eat the caterpillars for you.
Plant Tolerant Varieties: Some examples of green cabbage varieties that are a more resistant are Green Winter, Savoy, and Savoy Chieftain. You can also try planting red-leafed varieties of cabbage and kohlrabi, which are less desirable because of lack of camouflage for the 2 green caterpillars.
Attract Beneficial Insects: You can either buy them directly, or plant a good selection of flowers and flowering herbs around your brassicas to attract the beneficial insects that will prey on your pests. Some plants to use for this would be parsley, dill, fennel, coriander, and sweet alyssum. (Be careful if cross-striped cabbageworms are your culprit, because they also destroy parsley.) These flowers will attract parasitic wasps, paper wasps, yellow jackets, and shield bugs. Parasitic wasps will lay their white cocoons on the caterpillars’ backs. Leave the cocoons alone to kill off your pest, and then you’ll have a new generation of parasitic wasps for later waves of pests. If you don’t want to rely on your flowers to attract them, you can purchase trichogramma wasps, and release them to destroy the pests’ eggs.
Use Companion Planting: Interplant companion plants among your brassicas that repel the butterflies/moths, like aromatic herbs such as lemon balm, sage, oregano, borage, hyssop, dill, and rosemary, or high blossom flowers like tall marigolds or calendula.
Use Trap Crops: For Loopers, plant celery or amaranth. For Cabbage Worms, plant nasturtiums or mustard. The butterflies/moths will lay their eggs on those crops first, and then once you see the pests, you can dispose of the trap crop to get rid of them.
Frequent Harvesting: For the cut and come again crops, such as Kale and Collard Greens, harvest the leaves more frequently to interrupt the pest life cycle.
Pheromones: Use pheromone traps to monitor and control their populations.
Biological Pesticides: Spray with BT (Bacillus thuringiensis). It’s a natural bacterium that kills caterpillars and worms. BTK sprays in particular do not harm honey bees or birds and are safe to use around pets and children. One source said to spray for Loopers early in the season as a preventative, and then use again for later waves. For cabbage worms, it said to spray every 2 weeks until they get under control. Another source said that one treatment in late summer approximately 2 weeks before harvest can greatly improve your crop quality. You’ll have to reapply after rain though.
Diatomaceous Earth (DE): DE is a very fine powder that when sprinkled can cut up any soft-bodied insect that comes into contact with it. This also has to be reapplied after rain.
Insecticidal Soap: Spray with Organic Insecticidal soap, but this also has to be reapplied after the rain.
Other Repellent Sprays: For Loopers, you can spray the crops with liquefied and strained cabbage loopers or hot pepper spray.
Seasonal Clean Up: For the cabbage worms, do a thorough fall clean-up of old plants and debris, since the butterflies like to overwinter there. (The white cabbage butterfly usually shows up early in the spring because they overwinter instead of migrate.)
Use Decoys: This method is a little experimental, but supposedly the Cabbage Butterflies are territorial and don’t like to lay their eggs if they think another female has already claimed your plants. So you can make white butterfly-shaped decoys out of plastic or another durable material, and put them by your garden plants. Make them 2 inches wide, and with 2 black spots on the upper wing. I think I’m going to repurpose some milk cartons and give it a try. Here’s the link to a template: http://goodseedco.net/blog/posts/cabbage-butterfly-decoy
RESOURCES
This was a very beneficial website that gave some practical tips on controlling cabbage loopers: https://www.planetnatural.com/pest-problem-solver/garden-pests/cabbage-looper-control/
Missouri Botanical Garden has info and tips:
Imported cabbageworm: https://www.missouribotanicalgarden.org/gardens-gardening/your-garden/help-for-the-home-gardener/advice-tips-resources/pests-and-problems/insects/caterpillars/imported-cabbageworm.aspx
Other Sources:
https://savvygardening.com/guide-to-vegetable-garden-pests/
Brassica Pests: Identification (Part 1 of 2)
Learn to identify the pests that damage brassica crops of collard greens, kale, broccoli, and cabbage.
By Rebecca Halcomb, Leadership in Urban Agriculture Internship, Fall II 2020
I had a lot of pest issues this year, but the ones that did the most damage were the pests that took out my brassica crops of collard greens, kale, broccoli, and cabbage.
I had hand-removed a few caterpillars, but less than a week later, this was what I found when I walked out to my garden on August 14th:
These had been the largest most beautiful collard greens I’d ever grown, and were now covered in caterpillars I didn’t recognize:
When I came to intern at Urban Harvest STL, I noticed one of the same pests I had encountered on my brassicas, and learned it was called a cabbage looper. I originally thought it was just the cabbage looper in various phases that I was dealing with in my garden, but when I started researching and looked back at my garden pictures, I noticed that the caterpillars on my collard greens and kale were different from the caterpillars on my broccoli, so I was dealing with multiple pests. I decided to research both pests I had issues with, and then I also ended up finding info on another cabbageworm called the imported cabbageworm. That caterpillar looked very similar to the cabbage looper, but the butterfly was different, so I wanted to address those as well.
First let’s look at how to identify all 3 brassica-eating culprits.
Cabbage Looper ID
Here’s a picture of the cabbage looper moth to look out for.
It will lay eggs that look like this.
As a caterpillar, it will look like this.
Imported Cabbage Worm ID
The imported cabbage white butterfly to watch out for, that produces the green imported cabbage worm, looks very similar to the cabbage looper caterpillar.
Their eggs are also tiny and white, but more cone-shaped.
This is what the green cabbage worm looks like. It’s slightly fatter, doesn’t make the distinctive loop with its back when it crawls, and has a faint yellow stripe down the back.
Cross-Striped Cabbageworm ID
It took me awhile to find the name for the striped caterpillar that skeletonized my collards so badly, but I finally found my worst culprit: the cross-striped cabbageworm.
Here are some pictures of the moth to look out for, the eggs they will lay, and a better close up of the caterpillar:
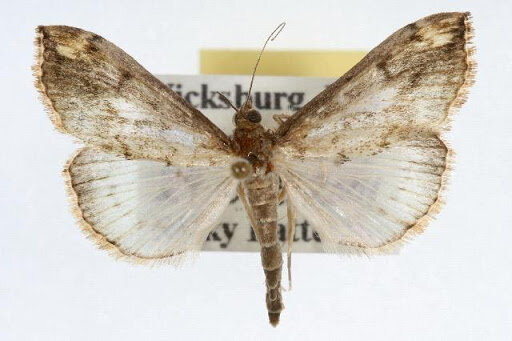
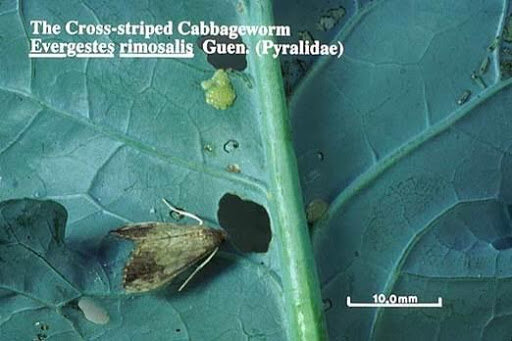
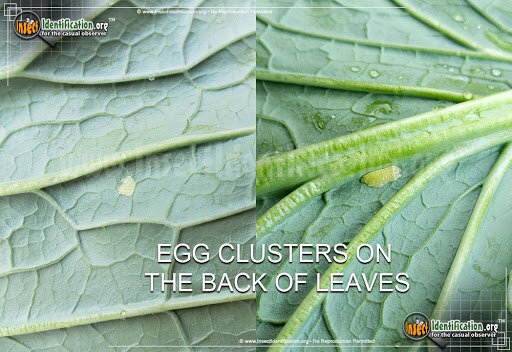
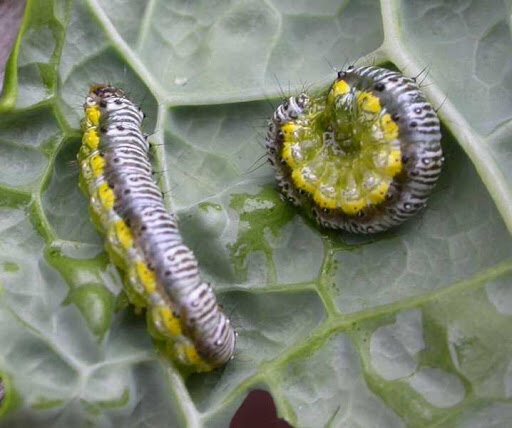
The moral of this is that pest ID can sometimes be tricky, but it’s definitely worth it so you know what you’re dealing with, and the best way to manage the pest so that you can harvest as much high quality crop as possible. In Part 2, we’ll examine how to thwart our brassica foes.
Resources
University Extension websites have compiled a lot of helpful info on garden pests:
University of Minnesota Extension has pictures of the cabbage looper eggs, which are very tiny white round dots, about the size of a pinhead. There are also pictures of the dark green pellets that they excrete: https://www.vegedge.umn.edu/pest-profiles/pests/cabbage-looper
UMass and UConn Extensions have some good info on the Cross-Striped Cabbage Worm: https://ag.umass.edu/vegetable/fact-sheets/cross-striped-cabbage-worm
http://ipm.uconn.edu/documents/raw2/html/579.php?display=print
Non-Extension Resources:
This website has pictures of the various Cabbage Looper stages, their defining characteristics for accurate ID, as well as a full list of the plants they feed on, and their egg laying schedule: http://www.idtools.org/id/citrus/pests/factsheet.php?name=Cabbage+looper
This website notes the difference between the Cabbage looper and Imported cabbageworms: https://www.growveg.com/pests/us-and-canada/cabbage-worm-cabbageworm-cabbage-looper/
Some helpful info that compare the 2 cabbageworms: https://theberkshireedge.com/natures-turn-unwelcome-cabbage-white-butterflies-and-dreaded-cross-striped-cabbage-moths/
Indigenous Agricultural Practices
Learn about Indigenous agricultural practices and some facts about traditional native food.
By Shea Metzler Leadership in Urban Agriculture Internship, Fall I 2020
Click on the image for a PDF version of the guide.
Friend or Foe: What You Didn't Know About Weeds
Weeding is one of the most essential tasks in gardening, and the job is never done. These backyard “volunteers” always seem to find a way to thrive. Knowing your weeds can help you out. Some weeds are tricky to combat and can really hurt your plants, but others can be quite useful. Knowing these things can help lessen your load and maybe even bring a little something extra to your garden. This video will focus on a few different weeds and how they might affect your garden.
By Louise Haupert, Leadership in Urban Agriculture Internship, Fall I 2020
For the video transcript, click here.
Environmental Justice Initiatives in St. Louis
Find out more about environmental justice and food justice work happening in St. Louis!
A Beginner’s Guide to Comfrey & Echinacea for Gardening and Healing
By Shannon Haubrich, Leadership in Urban Agriculture Internship, Summer III 2020
COMFREY
(Symphytum officinale)
Native to Europe, western Asia
Perennial
Comfrey digs very deep roots which absorb and redistribute nutrients in soil, which makes it an incredible ‘chop and drop’ fertilizer. It shades surrounding plants, acting as a living mulch, and when chopped, the plant breaks down, adding the absorbed nutrients back into the soil. Comfrey attracts pollinators, too!
MEDICINAL USES
Encourages wound healing
Diminishes scarring
Relieves arthritis and general muscle/joint pain
Provides healing for digestive ulcers
Eyewash for irritated eyes
*Take caution and research before using topically on an open wound or ingesting! Comfrey may re-bind skin and tissue too quickly, or seal in existing infection. It is also argued that comfrey, when ingested, can be harmful to the liver. Many people ingest comfrey in small amounts, but do plenty of research and ingest only if you feel safe.
COMFREY OIL RECIPE
Harvest comfrey leaves and allow them to dry overnight or in a dehydrator. Fill a glass jar halfway with the leaves, then cover with good-quality oil (cold-processed olive and/or coconut oils work well). Cover tightly, and let sit 4-6 weeks, occasionally giving the jar a light swirl/stir. After 4-6 weeks, strain out the herbs, and use the oil for topical application of comfrey as needed.
ECHINACEA
(two common species are E. purpurea & E. angustifolia)
Native to North America
Perennial
Echinacea grows abundantly in Missouri! It attracts many pollinators like butterflies, predatory wasps, and pollinating flies, making it a great companion for certain vegetables like tomatoes and peppers. Echinacea is also known to attract the goldfinch, which is lovely to see and friendly to garden fertilization.
MEDICINAL USES
Healing for wounds, bites, and stings
Immune support (take with raw, organic garlic for a powerful kick to viral infections)
Strengthens and clears lymph nodes
Powerful against infections, internal or external (i.e. bladder, ear)
Can be used as a pain reliever (Echinacea’s numbing effect makes it useful for dental pain)
ECHINACEA TEA RECIPE
Harvest any leaves, flowers, or roots you’d like to use in your tea (or use dried, store-bought echinacea). Boil water, pour over echinacea, and let steep for 15 minutes. This long steep time allows the medicinal properties to be extracted, especially from the plant’s thick roots.
How to Make a Milk Crate Garden
Follow these simple steps to make your own milk crate garden!
Beginner's Guide to Permaculture and Home Gardening
Collectively realizing ecological and food justice can and will start small, especially through the bioregional practice of integrating permaculture principles into home gardening.
By Liz Burkemper, Leadership in Urban Agriculture Internship, Summer II 2020
Collectively realizing ecological and food justice can and will start small, especially through the bioregional practice of integrating permaculture principles into home gardening.
To live bioregionally means to live in place: we are cognizant and contemplative of the ecological needs of our places, whether terrestrially or communally. We nourish Earth instead of stripping it down, we grow and eat in awareness of the natural ecosystems and natively thriving plants, we grow with the Earth instead of against it, we abide with our community rather than separately from it.
Our home gardens are perfect grounds for beginning to do so toward listening to the Earth and nourishing our (and our community’s) body. Through the practice of permaculture, we might thoroughly enjoy the Earth’s fruits—grown in harmony rather than in opposition—and what we don’t enjoy, we give away to our neighbors and back to the soil.
Some tips on bringing permaculture to your backyard/home garden:
1. Grow your soil! Instead of tilling, feed your garden beds—layer with cardboard or leaves/grass clippings from your yard. Through permaculture, we learn that every part of the life cycle is useful, and that soil is living, so we must nourish it instead of snuffing out its natural vitality.
2. Grow perennials! Unlike annual-only plants, perennials—especially when planted polyculturally so as to balance the garden ecosystem—won’t zap the soil nutrients + don’t need to start from seed over and over again. Think kale, garlic, rhubarb, chives, asparagus, artichokes!
a. Don’t forget: “perennial” does not mean “no tending required”!
b. Since perennials grow differently than many crops favored by modern industrial agriculture, many of these plants have been lost to history or are rarely found in the grocery store. Don’t be afraid to try veggies you have never tasted before!
3. Mulch mulch mulch! Mulch is the ultimate soil protector—from dryness + erosion, of essential microorganisms and insects, of soil moisture. Here’s an easy guide to permaculture mulching in your garden.
a. Use organic materials from your own lawn: grass clippings, leaves, pine needles, fallen branches, twigs, bark, (sometimes) rocks...
b. ...or find local byproducts (which are often free): grain husks, sawdust, woodchips c. Make a layer that’s three inches thick, and do it again!
4. Build a creative (i.e. no-row) space! Gardening and farming through plowed rows resists the natural thriving of plants, even visually—planted rows mean empty rows between them. Instead, mix your tall + short plants, let vines grow upwards on corn stalks, and plant with curves so as to use your garden space wisely and ensure healthy microclimates for your plants.
a. Unconvinced of the rad benefits of row-less gardening? Check out this deep dive into the advantages for small-scale gardeners!
b. Used on the Urban Harvest STL farms, raised rows are another low-maintenance, no-till means of building up your garden.
5. Don’t waste! Permaculture thrives on a closed-loop system: all waste (output) is reintegrated as resources (input) so as to ensure the dynamism and energy efficiency of the growing system. This means harvesting seeds, using weeds to rebuild the soil, composting, and more.
These are just some beginner’s tips! At the heart of permaculture and bioregionalism is listening and paying attention to the land on which we live, instead of forcing our own thoughts and desires onto the land or into our communities. This listening can be practiced anywhere and everywhere.
For more diving and digging, check out Deep Green Permaculture’s guide to starting your own permaculture garden + Permaculture News’ guide to doing so small-space intensively.
