Get Started: Indoor Gardening Activities for Kids
Learn how to re-grow food from scraps!
Simple Indoor Gardening Activities for Kids
It’s almost spring, which is a great time to explore plant and garden activities with children. There are many fun options for families even if you do not have an established garden or an outdoor growing space. Last season, we shared a great indoor seed germination project. This post introduces two family-friendly activities that require very few materials or growing experience, use left-over “kitchen scraps” and easy to find vegetables, and provide a hands-on growing experience for children of all ages.
Regrowing Food from Vegetable Scraps
This project can be done with a variety of common vegetable scraps, such as green onions, romaine lettuce, or celery (bottom 2-3”). You may also use the “tops” (top 1-1.5”) of root vegetables like carrots and beets with the same technique.
MATERIALS:
Vegetable scraps of choice
Water
Shallow glass or dish (clear if possible)
Sunny window
(Optional) potting soil and container
STEPS:
Keep the bottom 2-3” of celery, lettuce or green onion. If using root vegetables, keep the top 1-1.5” of the carrot, beet, radish, etc.
Place the vegetable ends in a shallow dish or glass and cover with a small amount of water, making sure to only cover about ½” of the base.
Place the dish on a sunny windowsill.
Replace with fresh water daily or when you notice the water in the dish is getting murky or brown. This is a great task for kids.
Watch the plant grow! New growth will emerge from the center of the scraps. Older kids may enjoy measuring and tracking the growth of the new plant and watching for the emergence of roots in the water. The plants are usually fast growing and fun to watch!
After ~2 weeks, you should see new roots growing in the water. At this point you can either cut off and eat the new leafy growth, or you can plant the base of the vegetable in a container with potting soil and allow it to grow even larger. Root vegetables like carrots will need to be transplanted into soil to fully regenerate.
If you re-pot the plant, continue to water it near the soil, keeping it moist but not soggy. When the plant is your desired size, harvest and enjoy!
Sweet Potato Houseplant
Sweet potatoes are vining plants with heart-shaped leaves that make a beautiful and easy to set-up houseplant. This project is an excellent demonstration of plant growth for children, and has the option of extending to an outdoor project, if desired.
MATERIALS:
Whole Sweet potato (*may have better luck with organic varieties)
Jam or Mason jar
Water
Toothpicks
Sunny window
(Optional) potting soil and container
STEPS:
Stick 3 - 4 toothpicks into the midpoint of the raw sweet potato, about half way down the length. These will rest on the lip of the jar to suspend the potato above the water.
Fill the jar with water and place the potato into the opening of the jar with the “pointed” end facing down and submerged into the top inch of water.
Place the potato jar on a warm and sunny windowsill, and monitor the water level to keep the bottom inch of the potato submerged.
After 2-4 weeks, you should be able to see new root and leafy growth. This is a great chance to talk to children about the parts of the plant and the role of roots in “drinking” water to keep the plant alive. Ask children to observe changes in the plant; older kids might enjoy recording and measuring the new growth.
(Optional) When the roots grow long enough to reach the base of the jar, you may re-pot the potato in a container with potting soil and compost blend. The pot should be big enough to contain the roots without cutting or folding them. This will allow the plant to continue to grow, and you can continue to transplant into larger pots as a houseplant when the roots outgrow the container.
(Optional) You may also break off the new shoots from the top of the potato (make sure you get at least 4-6”) or plant them outdoors as “slips” if you want to obtain a harvest later. Children LOVE digging for sweet potatoes! Sweet potato vines are sprawling and will need either space or a trellis to grow on.
Getting Stared: Seeding Spring Crops Indoors
Dig a little deeper into why, when, and how to start your seeds indoors before you plant them outside!
Why Start Seeds Indoors?
It is a great idea to plant seeds indoors for crops that tolerate transplanting into your garden as seedlings. Plants started indoors have better germination rates due to a stable environment and protection from pests, and vigorous seedlings can flower and be ready to harvest sooner. Plus, you’ll soon have beautiful baby plants to brighten up the last dreary days of winter!
What Seeds Can I Plant in Winter?
Not all plants like to be transplanted as seedlings, but many popular crops get a good head start indoors. Seed packages will indicate if the seed can be started indoors or be sown directly outside. Many early crops, including broccoli, cauliflower, kale, and lettuces, can all be started in February! Our farmers start the following spring crops in our greenhouse: kale, collards, mustard, and Swiss chard.
Other crops that will transplant into your garden early and tolerate light frosts include: all brassicas (Broccoli, Brussels sprouts, Cauliflower, and Cabbage), and leafy greens such as Collards, Mustards, and all Lettuce varieties.
The right time to start seeds indoors depends on two main factors: 1) When they can be planted outside, and 2) How long they need to grow to the appropriate size. To figure this out, you need to know your region’s average last frost date. In Missouri, we are in zone 6B and this date is April 15th. This is the date that divides when you can transplant early crops (that tolerate light frost) from those that must be transplanted weeks after the last frost in warmer soil.
Many warm season vegetables and herbs can also be started early (February or March), and kept for longer indoors. By the end of February, our farmers will start tomatoes, peppers, eggplant, thyme, sage, and lavender seeds in our greenhouse. These seedlings need more time to be ready for transplant, so it helps to start them early.
Find your Planting Calendar
This can seem like a lot of information to manage! Getting some help from a good planting calendar helps you determine when to start your crops. Many agricultural extension services publish calendars for their region. Here in Missouri, Missouri University Extension maintains a guide on when to start seeds indoors and a planting calendar that details when transplants can be moved outdoors and seeds be sown directly outside.
DIY Seed Trays
Popular seed-starting containers that you can purchase at a nursery or home and garden store include: plastic, wooden, or fiber trays, small plastic or ceramic pots, biodegradable peat pots, and peat pellets. However, if you’re looking for upcycling options to save money and reuse materials, you have many options! Here are some fun DIY seed tray ideas: Eggshells and egg cartons, Takeout containers, milk cartons, toilet paper rolls, and newspaper pots.
Tips for Strong Seedlings
Germination medium
You may purchase or make your own germination mix, which must be fine-textured, loose and light weight, and drain quickly. It is best not to use regular planting soil or fertilizer at this early stage.
The primary components of these mixes are: Perlite, Peat, and Vermiculite
Enough light
Seeds do not need light to germinate, but once they’ve sprouted they will definitely need plenty! Seeds often do very well under “grow lights,” but if this is not something you can do, make sure to place them in a south-facing window to maximize how much sunlight they get each day.
Air circulation
Initially, many growers cover their seed trays with a clear plastic dome. This creates a mini-greenhouse effect, trapping humidity and warmth to promote germination. Once your seeds have sprouted, however, it’s a good idea to remove the dome regularly to get fresh air to the seedlings.
Air flow and a breeze on your growing seedlings will help strengthen their stems. Many gardeners set up fans indoors to circulate air, but you can also replicate this effect by regularly running your hands gently over the seedlings to simulate air movement.
Watering
Seeds and seedlings do best when kept evenly moist. Too much water will promote mould growth in your germination mix or even drown your roots. Check daily to make sure that the growing media is damp rather than dry or soaking, and lightly water when needed.
For more details, check out MU Extension’s guide to starting plants indoors from seed.
Brassica Pests: Solutions (Part 2 of 2)
Once you have identified which pest is attacking your brassica crops, then you can work towards managing the problem. In this case, most of the treatments are very similar for all 3 kinds of caterpillars.
By Rebecca Halcomb, Leadership in Urban Agriculture Internship, Fall II 2020
Once you have identified which pest is attacking your brassica crops, then you can work towards managing the problem. In this case, most of the treatments are very similar for all 3 kinds of caterpillars. There are a few specific solutions, but I’ll note those below:
Row Covers: Cover brassica crops with floating row cover or screen cover from when you plant to when you harvest to keep the butterflies and moths off. You should still regularly inspect though. You can also use pantyhose on cabbage heads, and those will grow with the plant and let enough air, sunlight, and moisture in.
Hand-picking: It can be time-consuming and they can be easy to miss, especially the 2 green species. They like to hide on the underside of the leaves, and blend in with the leaf veins. It’s actually much easier to see their dark green frass (poop) than it is to see them. You can drown them in soapy water once you pick them off.
Use Predators: Hang birdhouses in or near the garden or let the chickens into the garden temporarily once the plants are hardy enough, and they will eat the caterpillars for you.
Plant Tolerant Varieties: Some examples of green cabbage varieties that are a more resistant are Green Winter, Savoy, and Savoy Chieftain. You can also try planting red-leafed varieties of cabbage and kohlrabi, which are less desirable because of lack of camouflage for the 2 green caterpillars.
Attract Beneficial Insects: You can either buy them directly, or plant a good selection of flowers and flowering herbs around your brassicas to attract the beneficial insects that will prey on your pests. Some plants to use for this would be parsley, dill, fennel, coriander, and sweet alyssum. (Be careful if cross-striped cabbageworms are your culprit, because they also destroy parsley.) These flowers will attract parasitic wasps, paper wasps, yellow jackets, and shield bugs. Parasitic wasps will lay their white cocoons on the caterpillars’ backs. Leave the cocoons alone to kill off your pest, and then you’ll have a new generation of parasitic wasps for later waves of pests. If you don’t want to rely on your flowers to attract them, you can purchase trichogramma wasps, and release them to destroy the pests’ eggs.
Use Companion Planting: Interplant companion plants among your brassicas that repel the butterflies/moths, like aromatic herbs such as lemon balm, sage, oregano, borage, hyssop, dill, and rosemary, or high blossom flowers like tall marigolds or calendula.
Use Trap Crops: For Loopers, plant celery or amaranth. For Cabbage Worms, plant nasturtiums or mustard. The butterflies/moths will lay their eggs on those crops first, and then once you see the pests, you can dispose of the trap crop to get rid of them.
Frequent Harvesting: For the cut and come again crops, such as Kale and Collard Greens, harvest the leaves more frequently to interrupt the pest life cycle.
Pheromones: Use pheromone traps to monitor and control their populations.
Biological Pesticides: Spray with BT (Bacillus thuringiensis). It’s a natural bacterium that kills caterpillars and worms. BTK sprays in particular do not harm honey bees or birds and are safe to use around pets and children. One source said to spray for Loopers early in the season as a preventative, and then use again for later waves. For cabbage worms, it said to spray every 2 weeks until they get under control. Another source said that one treatment in late summer approximately 2 weeks before harvest can greatly improve your crop quality. You’ll have to reapply after rain though.
Diatomaceous Earth (DE): DE is a very fine powder that when sprinkled can cut up any soft-bodied insect that comes into contact with it. This also has to be reapplied after rain.
Insecticidal Soap: Spray with Organic Insecticidal soap, but this also has to be reapplied after the rain.
Other Repellent Sprays: For Loopers, you can spray the crops with liquefied and strained cabbage loopers or hot pepper spray.
Seasonal Clean Up: For the cabbage worms, do a thorough fall clean-up of old plants and debris, since the butterflies like to overwinter there. (The white cabbage butterfly usually shows up early in the spring because they overwinter instead of migrate.)
Use Decoys: This method is a little experimental, but supposedly the Cabbage Butterflies are territorial and don’t like to lay their eggs if they think another female has already claimed your plants. So you can make white butterfly-shaped decoys out of plastic or another durable material, and put them by your garden plants. Make them 2 inches wide, and with 2 black spots on the upper wing. I think I’m going to repurpose some milk cartons and give it a try. Here’s the link to a template: http://goodseedco.net/blog/posts/cabbage-butterfly-decoy
RESOURCES
This was a very beneficial website that gave some practical tips on controlling cabbage loopers: https://www.planetnatural.com/pest-problem-solver/garden-pests/cabbage-looper-control/
Missouri Botanical Garden has info and tips:
Imported cabbageworm: https://www.missouribotanicalgarden.org/gardens-gardening/your-garden/help-for-the-home-gardener/advice-tips-resources/pests-and-problems/insects/caterpillars/imported-cabbageworm.aspx
Other Sources:
https://savvygardening.com/guide-to-vegetable-garden-pests/
Brassica Pests: Identification (Part 1 of 2)
Learn to identify the pests that damage brassica crops of collard greens, kale, broccoli, and cabbage.
By Rebecca Halcomb, Leadership in Urban Agriculture Internship, Fall II 2020
I had a lot of pest issues this year, but the ones that did the most damage were the pests that took out my brassica crops of collard greens, kale, broccoli, and cabbage.
I had hand-removed a few caterpillars, but less than a week later, this was what I found when I walked out to my garden on August 14th:
These had been the largest most beautiful collard greens I’d ever grown, and were now covered in caterpillars I didn’t recognize:
When I came to intern at Urban Harvest STL, I noticed one of the same pests I had encountered on my brassicas, and learned it was called a cabbage looper. I originally thought it was just the cabbage looper in various phases that I was dealing with in my garden, but when I started researching and looked back at my garden pictures, I noticed that the caterpillars on my collard greens and kale were different from the caterpillars on my broccoli, so I was dealing with multiple pests. I decided to research both pests I had issues with, and then I also ended up finding info on another cabbageworm called the imported cabbageworm. That caterpillar looked very similar to the cabbage looper, but the butterfly was different, so I wanted to address those as well.
First let’s look at how to identify all 3 brassica-eating culprits.
Cabbage Looper ID
Here’s a picture of the cabbage looper moth to look out for.
It will lay eggs that look like this.
As a caterpillar, it will look like this.
Imported Cabbage Worm ID
The imported cabbage white butterfly to watch out for, that produces the green imported cabbage worm, looks very similar to the cabbage looper caterpillar.
Their eggs are also tiny and white, but more cone-shaped.
This is what the green cabbage worm looks like. It’s slightly fatter, doesn’t make the distinctive loop with its back when it crawls, and has a faint yellow stripe down the back.
Cross-Striped Cabbageworm ID
It took me awhile to find the name for the striped caterpillar that skeletonized my collards so badly, but I finally found my worst culprit: the cross-striped cabbageworm.
Here are some pictures of the moth to look out for, the eggs they will lay, and a better close up of the caterpillar:
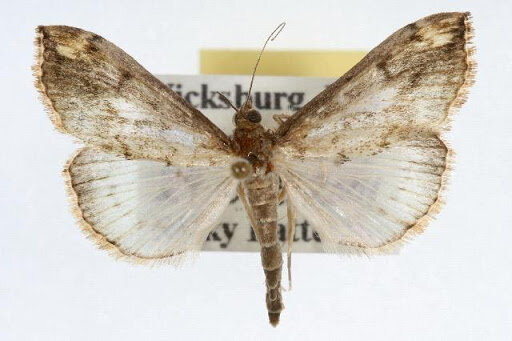
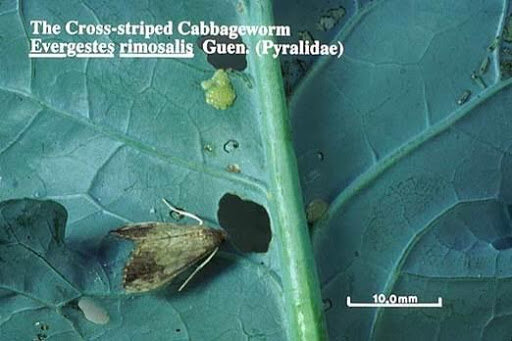
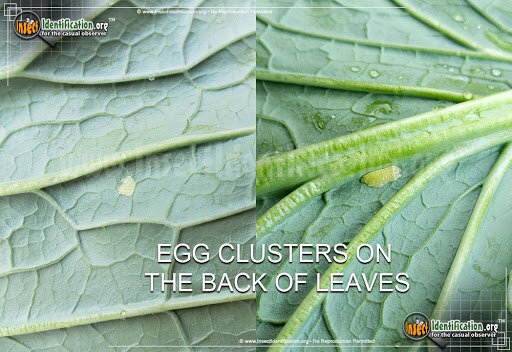
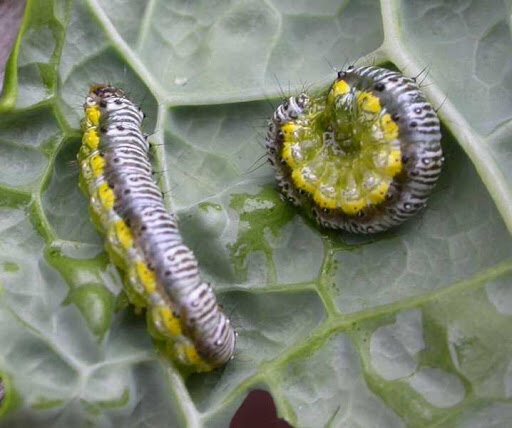
The moral of this is that pest ID can sometimes be tricky, but it’s definitely worth it so you know what you’re dealing with, and the best way to manage the pest so that you can harvest as much high quality crop as possible. In Part 2, we’ll examine how to thwart our brassica foes.
Resources
University Extension websites have compiled a lot of helpful info on garden pests:
University of Minnesota Extension has pictures of the cabbage looper eggs, which are very tiny white round dots, about the size of a pinhead. There are also pictures of the dark green pellets that they excrete: https://www.vegedge.umn.edu/pest-profiles/pests/cabbage-looper
UMass and UConn Extensions have some good info on the Cross-Striped Cabbage Worm: https://ag.umass.edu/vegetable/fact-sheets/cross-striped-cabbage-worm
http://ipm.uconn.edu/documents/raw2/html/579.php?display=print
Non-Extension Resources:
This website has pictures of the various Cabbage Looper stages, their defining characteristics for accurate ID, as well as a full list of the plants they feed on, and their egg laying schedule: http://www.idtools.org/id/citrus/pests/factsheet.php?name=Cabbage+looper
This website notes the difference between the Cabbage looper and Imported cabbageworms: https://www.growveg.com/pests/us-and-canada/cabbage-worm-cabbageworm-cabbage-looper/
Some helpful info that compare the 2 cabbageworms: https://theberkshireedge.com/natures-turn-unwelcome-cabbage-white-butterflies-and-dreaded-cross-striped-cabbage-moths/
Friend or Foe: What You Didn't Know About Weeds
Weeding is one of the most essential tasks in gardening, and the job is never done. These backyard “volunteers” always seem to find a way to thrive. Knowing your weeds can help you out. Some weeds are tricky to combat and can really hurt your plants, but others can be quite useful. Knowing these things can help lessen your load and maybe even bring a little something extra to your garden. This video will focus on a few different weeds and how they might affect your garden.
By Louise Haupert, Leadership in Urban Agriculture Internship, Fall I 2020
For the video transcript, click here.
Get Started: Building your Garden’s Tool Kit
These simple steps will help keep your tools in good shape and last longer. It is important to clean and sanitize tools that have been used on sick plants to prevent the spread of diseases to healthy plants. Sharp tools are safer to use and make cleaner cuts that avoid damaging plants and making them susceptible to pests or disease.
RECOMMENDED TOOLS
Gloves
Garden Hose
Spray Nozzle / Watering Wand (*breaks up water, adjustable force)
Hand Trowel
Hand Cultivator
Hand Pruner
Watering can (*indoor and patio containers)
Loppers (*pruning thicker branches >1” diameter)
Digging Fork
Garden Spade (*sharp square shovel for digging holes)
Rake (*for leaf debris)
Wheelbarrow (*for moving compost and mulch)
TOOL CARE
These simple steps will help keep your tools in good shape and last longer. It is important to clean and sanitize tools that have been used on sick plants to prevent the spread of diseases to healthy plants. Sharp tools are safer to use and make cleaner cuts that avoid damaging plants and making them susceptible to pests or disease.
DAILY MAINTENANCE
Rinse digging tools and remove caked-on dirt with a stiff brush or scrubbing pad
Rinse and scrub garden shears or pruners with soapy water. Use a foaming bathroom cleaner and let sit before scrubbing. Make sure tools are completely dry before storing them.
Store tools in a dry, well-ventilated shed or garage. Large tools should be hung upside down so as not to dull their blades and be kept off of floors to control moisture (and rust)
SEASONAL TASKS
Removing Rust: To prevent rust, make sure that your tools are dry before you store them. Rubbing linseed or mineral oil onto the tool will also help prevent rust. If rust has already occurred, there are still a few options:
Mix a 1:1 ratio of water and vinegar, and soak tools overnight
In the morning, use steel wool to scrub in a circular motion
Wash with soapy water and rinse thoroughly
Once dry, you may also rub the tool with linseed or mineral oil (always wait 24 hours after applying oil before using tools to prevent solvent contamination)
Cleaning garden blades: Before winter storage, bladed tools like pruners or loppers should be sanitized and sharpened.
Use rust prevention directions above
Keep tools sharp with a pruner-sharpening tool, file, or stone.
Push the sharpener in the same direction (not back and forth) across the blade and follow the original bevel angle.
For damaged blades or expensive tools, professional sharpening is an option - Jansen Sharpening is a St. Louis based business that specializes in sharpening and blade repair.
Wood handle care:
At the end of the year, you can lightly sand and apply linseed oil to condition handles
Large cracks mean that the handle may have to be replaced, but small splinters may be sanded down safely.
You can also find a helpful YouTube video tutorial on caring for your tools here.
SAFETY NOTES
Do not wad up oil-soaked rags, especially those soaked with linseed oil, or put them in an enclosed container as there is combustion risk. Let them air dry between uses.
Wear eye protection and heavy gloves when using any sharpening equipment to protect against metal slivers.
ADDITIONAL RESOURCES
A Beginner’s Guide to Comfrey & Echinacea for Gardening and Healing
By Shannon Haubrich, Leadership in Urban Agriculture Internship, Summer III 2020
COMFREY
(Symphytum officinale)
Native to Europe, western Asia
Perennial
Comfrey digs very deep roots which absorb and redistribute nutrients in soil, which makes it an incredible ‘chop and drop’ fertilizer. It shades surrounding plants, acting as a living mulch, and when chopped, the plant breaks down, adding the absorbed nutrients back into the soil. Comfrey attracts pollinators, too!
MEDICINAL USES
Encourages wound healing
Diminishes scarring
Relieves arthritis and general muscle/joint pain
Provides healing for digestive ulcers
Eyewash for irritated eyes
*Take caution and research before using topically on an open wound or ingesting! Comfrey may re-bind skin and tissue too quickly, or seal in existing infection. It is also argued that comfrey, when ingested, can be harmful to the liver. Many people ingest comfrey in small amounts, but do plenty of research and ingest only if you feel safe.
COMFREY OIL RECIPE
Harvest comfrey leaves and allow them to dry overnight or in a dehydrator. Fill a glass jar halfway with the leaves, then cover with good-quality oil (cold-processed olive and/or coconut oils work well). Cover tightly, and let sit 4-6 weeks, occasionally giving the jar a light swirl/stir. After 4-6 weeks, strain out the herbs, and use the oil for topical application of comfrey as needed.
ECHINACEA
(two common species are E. purpurea & E. angustifolia)
Native to North America
Perennial
Echinacea grows abundantly in Missouri! It attracts many pollinators like butterflies, predatory wasps, and pollinating flies, making it a great companion for certain vegetables like tomatoes and peppers. Echinacea is also known to attract the goldfinch, which is lovely to see and friendly to garden fertilization.
MEDICINAL USES
Healing for wounds, bites, and stings
Immune support (take with raw, organic garlic for a powerful kick to viral infections)
Strengthens and clears lymph nodes
Powerful against infections, internal or external (i.e. bladder, ear)
Can be used as a pain reliever (Echinacea’s numbing effect makes it useful for dental pain)
ECHINACEA TEA RECIPE
Harvest any leaves, flowers, or roots you’d like to use in your tea (or use dried, store-bought echinacea). Boil water, pour over echinacea, and let steep for 15 minutes. This long steep time allows the medicinal properties to be extracted, especially from the plant’s thick roots.
How to Make a Milk Crate Garden
Follow these simple steps to make your own milk crate garden!
Get Started: Building Healthy Soil
Regenerative Agriculture is at the forefront of sustainability and climate resiliency in our food system. This is a set of principles and practices based on restoring our soils, watersheds, and biodiversity in our ecosystems. These practices also capture carbon in soil to mitigate atmospheric carbon and build resilience to climate change.
Regenerative Agriculture is at the forefront of sustainability and climate resiliency in our food system. This is a set of principles and practices based on restoring our soils, watersheds, and biodiversity in our ecosystems. These practices also capture carbon in soil to mitigate atmospheric carbon and build resilience to climate change.
REGENERATIVE HOME GARDENING
Although large scale agricultural projects can implement a number of different pasture and farming practices under this method, the most relevant techniques for home and community gardeners include:
No-till Gardening
Compost and Soil Amendments
In particular, both of these practices contribute to healthy and fertile soil.
SOIL FOOD WEB ILLUSTRATED
WHAT MAKES SOIL “HEALTHY” OR “UNHEALTHY”?
We can measure soil “health” in the diversity of organisms that make up the Soil Food Web and the soil’s ability to function as a complex living system. This ecosystem is able to effectively recycle nutrients and elements from decaying organic matter to feed new life.
“Unhealthy” soil is lacking organic matter and the ecosystem that it sustains, which makes life’s building blocks (nitrogen, carbon, phosphorus, potassium, and trace elements) less accessible for plant growth. Industrialized agriculture typically relies on synthetic chemical fertilizers in place of organic matter and its nutrient cycle. This depleted food web renders the productivity of the soil dependent on continued fertilizer application. The chemical runoff that occurs with rain events contaminates our waterways and contributes to“Dead zones” in our oceans. The cycle of soil and water health is connected on a global scale.
Even on a small scale, however, you can be part of the solution. The benefits of healthy soil in your garden include:
Disease and pest resistance in plants
Robust root and plant growth
Thriving pollinator populations
METHODS TO RESTORE SOIL HEALTH
Compost: This term refers to both the process of decomposition of organic materials and the finished product. It requires oxygen and relies on microbes and invertebrates to break down organic matter. Compost is a rich dark brown color, with a sweet earthy smell, and is free from large chunks of organic matter.
Compost is a crucial “soil amendment,” because it is added to soil to boost microbial life (food web), organic structure, and nutrient absorption by plants
Popular options for DIY composting include: “hot compost” outdoor pile, “in-vessel” rotating bin, worm compost, and bokashi buckets (indoor)
“No-Till” or No-Dig Gardening: This approach avoids deep digging, tilling, or turning over topsoil, which disrupts the soil food web ecosystem.
Amendments like compost, lime, fertilizer, etc, are simply added to the surface of the soil. This mimics how soil is formed in nature and retains its healthy spongy texture
Extensive mulching and use of cover crops or “green manure” replaces the task of weeding
Promotes aeration of soil and supports earthworm populations: remember “If you build it, they will come!” A robust food web will naturally attract worms and nature’s other recyclers into your garden.
Beginner’s Guide to Reading a Fertilizer Label
Confused about the numbers on the outside of a fertilizer bag? Not sure which one to purchase? This helpful guide breaks it down!
By Melanie Moser, Leadership in Urban Agriculture Internship, Summer I 2020
When farming, it’s vital to know what nutrients different plants need to thrive. All plants need three main elements to grow to their full potential- Nitrogen (N), Phosphorous (P), and Potassium (K). Fertilizer bags list these three ingredients prominently on the label with three numbers. For example, a fertilizer with an NPK number of 10-10-10 has equal parts Nitrogen, Phosphorous, and Potassium. Each of these elements are used by the plant in different ways, which will be discussed in depth below. But if your plants are underproducing or unhealthy, employing fertilizer could be just what the gardener ordered!
Soils (urban or otherwise) frequently lack these three important nutrients. But urban farmers need to pay special attention to fertilizing. In the urban setting, farmers are often bringing in soil ingredients or building garden beds from scratch. The soil in a city plot may be particularly devoid of nutrients due to pollutants, overdevelopment, or neglect. In this case, nutrients can be put back into the soil to ensure healthy and productive plants.
Store bought fertilizers often have more ingredients than NPK, which are listed in the ingredient label, but those elements comprise a much smaller percentage. When reading the NPK number, pay attention to the ratio of the three numbers, remembering that the numbers refer to a percentage of the whole.. The highest number in the ratio is funneling nutrients to promote a specific type of growth. Here’s the breakdown:
Nitrogen- Involved in many processes, but plays a vital role in photosynthesis. Often associated with big leafy growth. If you have too much Nitrogen, plants can get strong foliage, but not flower or fruit. Lawn fertilizer (pictured below) is very Nitrogen heavy because foliage is the goal. That being said, if a lawn doesn’t have healthy roots, it won’t do well during dry spells or over the long run. Vegetable garden fertilizer does not need nearly as much Nitrogen. Some additional sources of Nitrogen are manure, compost, blood meal, and feather meal. Another popular method is called “cover cropping.” At Urban Harvest St. Louis, farmers use this technique by cutting legumes and clovers down at the base after harvesting, leaving the root structure to decay in the soil. The legumes then release Nitrogen into the soil through their root nodules. This helps to stabilize the Nitrogen level for other plants that come next in the growing season.
Phosphorous- Plays a role in many of the basic plant functions- root growth, structural strength, flower and seed production. Without Phosphorus, plants will not reach their potential. Phosphorus can be found in phosphate rock, manure, compost, blood meal, and bone meal.
Potassium- Referred to as “the quality element” because it contributes to size, shape, color, and taste. A plant with a potassium deficiency is stunted and has lower yields. Sources of potassium include manure, compost, wood ash, and potash.
While it may seem complicated, I have found it quite effective to apply a standard organic 10-10-10 fertilizer consistently through the growing season. This is in addition to a yearly application of compost. In my home garden setting, this seems to do the trick. Before I studied fertilizer, I simply added compost. One year my peppers flowered, but didn’t fruit. Now I know that was due to a Phosphorous deficiency! A friend of mine just started his first garden and his seedlings never got off the ground. He felt he was growing a miniature garden. It’s clear his soil most likely needs more of all three- NPK. So, you know what they say. If you want to have a veggie Partay, it’s N.P.K.!
Additional Resources
https://feeco.com/npk-fertilizer-what-is-it-and-how-does-it-work/
