Brassica Pests: Solutions (Part 2 of 2)
Once you have identified which pest is attacking your brassica crops, then you can work towards managing the problem. In this case, most of the treatments are very similar for all 3 kinds of caterpillars.
By Rebecca Halcomb, Leadership in Urban Agriculture Internship, Fall II 2020
Once you have identified which pest is attacking your brassica crops, then you can work towards managing the problem. In this case, most of the treatments are very similar for all 3 kinds of caterpillars. There are a few specific solutions, but I’ll note those below:
Row Covers: Cover brassica crops with floating row cover or screen cover from when you plant to when you harvest to keep the butterflies and moths off. You should still regularly inspect though. You can also use pantyhose on cabbage heads, and those will grow with the plant and let enough air, sunlight, and moisture in.
Hand-picking: It can be time-consuming and they can be easy to miss, especially the 2 green species. They like to hide on the underside of the leaves, and blend in with the leaf veins. It’s actually much easier to see their dark green frass (poop) than it is to see them. You can drown them in soapy water once you pick them off.
Use Predators: Hang birdhouses in or near the garden or let the chickens into the garden temporarily once the plants are hardy enough, and they will eat the caterpillars for you.
Plant Tolerant Varieties: Some examples of green cabbage varieties that are a more resistant are Green Winter, Savoy, and Savoy Chieftain. You can also try planting red-leafed varieties of cabbage and kohlrabi, which are less desirable because of lack of camouflage for the 2 green caterpillars.
Attract Beneficial Insects: You can either buy them directly, or plant a good selection of flowers and flowering herbs around your brassicas to attract the beneficial insects that will prey on your pests. Some plants to use for this would be parsley, dill, fennel, coriander, and sweet alyssum. (Be careful if cross-striped cabbageworms are your culprit, because they also destroy parsley.) These flowers will attract parasitic wasps, paper wasps, yellow jackets, and shield bugs. Parasitic wasps will lay their white cocoons on the caterpillars’ backs. Leave the cocoons alone to kill off your pest, and then you’ll have a new generation of parasitic wasps for later waves of pests. If you don’t want to rely on your flowers to attract them, you can purchase trichogramma wasps, and release them to destroy the pests’ eggs.
Use Companion Planting: Interplant companion plants among your brassicas that repel the butterflies/moths, like aromatic herbs such as lemon balm, sage, oregano, borage, hyssop, dill, and rosemary, or high blossom flowers like tall marigolds or calendula.
Use Trap Crops: For Loopers, plant celery or amaranth. For Cabbage Worms, plant nasturtiums or mustard. The butterflies/moths will lay their eggs on those crops first, and then once you see the pests, you can dispose of the trap crop to get rid of them.
Frequent Harvesting: For the cut and come again crops, such as Kale and Collard Greens, harvest the leaves more frequently to interrupt the pest life cycle.
Pheromones: Use pheromone traps to monitor and control their populations.
Biological Pesticides: Spray with BT (Bacillus thuringiensis). It’s a natural bacterium that kills caterpillars and worms. BTK sprays in particular do not harm honey bees or birds and are safe to use around pets and children. One source said to spray for Loopers early in the season as a preventative, and then use again for later waves. For cabbage worms, it said to spray every 2 weeks until they get under control. Another source said that one treatment in late summer approximately 2 weeks before harvest can greatly improve your crop quality. You’ll have to reapply after rain though.
Diatomaceous Earth (DE): DE is a very fine powder that when sprinkled can cut up any soft-bodied insect that comes into contact with it. This also has to be reapplied after rain.
Insecticidal Soap: Spray with Organic Insecticidal soap, but this also has to be reapplied after the rain.
Other Repellent Sprays: For Loopers, you can spray the crops with liquefied and strained cabbage loopers or hot pepper spray.
Seasonal Clean Up: For the cabbage worms, do a thorough fall clean-up of old plants and debris, since the butterflies like to overwinter there. (The white cabbage butterfly usually shows up early in the spring because they overwinter instead of migrate.)
Use Decoys: This method is a little experimental, but supposedly the Cabbage Butterflies are territorial and don’t like to lay their eggs if they think another female has already claimed your plants. So you can make white butterfly-shaped decoys out of plastic or another durable material, and put them by your garden plants. Make them 2 inches wide, and with 2 black spots on the upper wing. I think I’m going to repurpose some milk cartons and give it a try. Here’s the link to a template: http://goodseedco.net/blog/posts/cabbage-butterfly-decoy
RESOURCES
This was a very beneficial website that gave some practical tips on controlling cabbage loopers: https://www.planetnatural.com/pest-problem-solver/garden-pests/cabbage-looper-control/
Missouri Botanical Garden has info and tips:
Imported cabbageworm: https://www.missouribotanicalgarden.org/gardens-gardening/your-garden/help-for-the-home-gardener/advice-tips-resources/pests-and-problems/insects/caterpillars/imported-cabbageworm.aspx
Other Sources:
https://savvygardening.com/guide-to-vegetable-garden-pests/
Brassica Pests: Identification (Part 1 of 2)
Learn to identify the pests that damage brassica crops of collard greens, kale, broccoli, and cabbage.
By Rebecca Halcomb, Leadership in Urban Agriculture Internship, Fall II 2020
I had a lot of pest issues this year, but the ones that did the most damage were the pests that took out my brassica crops of collard greens, kale, broccoli, and cabbage.
I had hand-removed a few caterpillars, but less than a week later, this was what I found when I walked out to my garden on August 14th:
These had been the largest most beautiful collard greens I’d ever grown, and were now covered in caterpillars I didn’t recognize:
When I came to intern at Urban Harvest STL, I noticed one of the same pests I had encountered on my brassicas, and learned it was called a cabbage looper. I originally thought it was just the cabbage looper in various phases that I was dealing with in my garden, but when I started researching and looked back at my garden pictures, I noticed that the caterpillars on my collard greens and kale were different from the caterpillars on my broccoli, so I was dealing with multiple pests. I decided to research both pests I had issues with, and then I also ended up finding info on another cabbageworm called the imported cabbageworm. That caterpillar looked very similar to the cabbage looper, but the butterfly was different, so I wanted to address those as well.
First let’s look at how to identify all 3 brassica-eating culprits.
Cabbage Looper ID
Here’s a picture of the cabbage looper moth to look out for.
It will lay eggs that look like this.
As a caterpillar, it will look like this.
Imported Cabbage Worm ID
The imported cabbage white butterfly to watch out for, that produces the green imported cabbage worm, looks very similar to the cabbage looper caterpillar.
Their eggs are also tiny and white, but more cone-shaped.
This is what the green cabbage worm looks like. It’s slightly fatter, doesn’t make the distinctive loop with its back when it crawls, and has a faint yellow stripe down the back.
Cross-Striped Cabbageworm ID
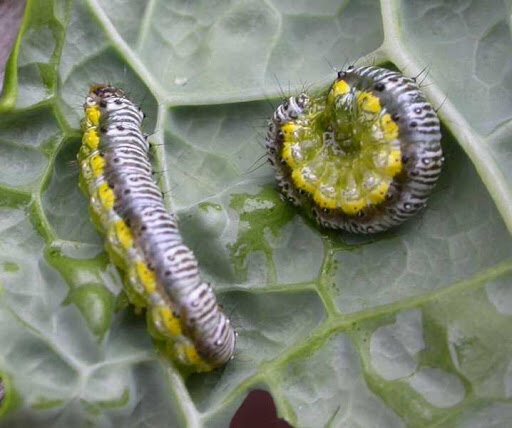
It took me awhile to find the name for the striped caterpillar that skeletonized my collards so badly, but I finally found my worst culprit: the cross-striped cabbageworm.
Here are some pictures of the moth to look out for, the eggs they will lay, and a better close up of the caterpillar:
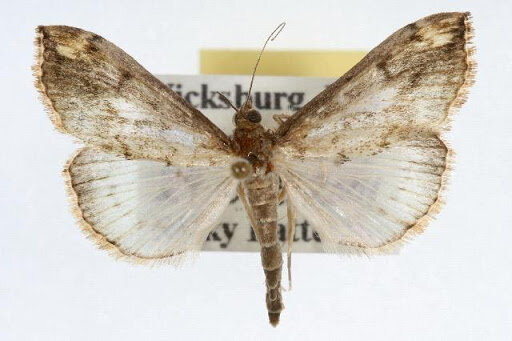
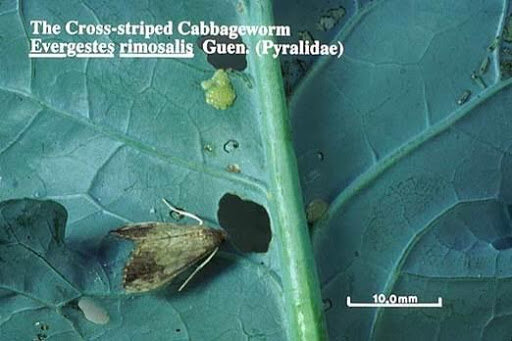
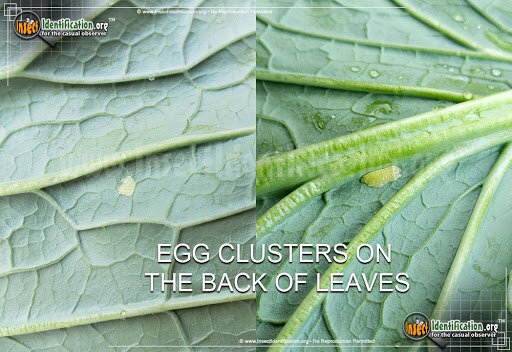
The moral of this is that pest ID can sometimes be tricky, but it’s definitely worth it so you know what you’re dealing with, and the best way to manage the pest so that you can harvest as much high quality crop as possible. In Part 2, we’ll examine how to thwart our brassica foes.
Resources
University Extension websites have compiled a lot of helpful info on garden pests:
University of Minnesota Extension has pictures of the cabbage looper eggs, which are very tiny white round dots, about the size of a pinhead. There are also pictures of the dark green pellets that they excrete: https://www.vegedge.umn.edu/pest-profiles/pests/cabbage-looper
UMass and UConn Extensions have some good info on the Cross-Striped Cabbage Worm: https://ag.umass.edu/vegetable/fact-sheets/cross-striped-cabbage-worm
http://ipm.uconn.edu/documents/raw2/html/579.php?display=print
Non-Extension Resources:
This website has pictures of the various Cabbage Looper stages, their defining characteristics for accurate ID, as well as a full list of the plants they feed on, and their egg laying schedule: http://www.idtools.org/id/citrus/pests/factsheet.php?name=Cabbage+looper
This website notes the difference between the Cabbage looper and Imported cabbageworms: https://www.growveg.com/pests/us-and-canada/cabbage-worm-cabbageworm-cabbage-looper/
Some helpful info that compare the 2 cabbageworms: https://theberkshireedge.com/natures-turn-unwelcome-cabbage-white-butterflies-and-dreaded-cross-striped-cabbage-moths/
Beginner’s Guide to Reading a Fertilizer Label
Confused about the numbers on the outside of a fertilizer bag? Not sure which one to purchase? This helpful guide breaks it down!
By Melanie Moser, Leadership in Urban Agriculture Internship, Summer I 2020
When farming, it’s vital to know what nutrients different plants need to thrive. All plants need three main elements to grow to their full potential- Nitrogen (N), Phosphorous (P), and Potassium (K). Fertilizer bags list these three ingredients prominently on the label with three numbers. For example, a fertilizer with an NPK number of 10-10-10 has equal parts Nitrogen, Phosphorous, and Potassium. Each of these elements are used by the plant in different ways, which will be discussed in depth below. But if your plants are underproducing or unhealthy, employing fertilizer could be just what the gardener ordered!
Soils (urban or otherwise) frequently lack these three important nutrients. But urban farmers need to pay special attention to fertilizing. In the urban setting, farmers are often bringing in soil ingredients or building garden beds from scratch. The soil in a city plot may be particularly devoid of nutrients due to pollutants, overdevelopment, or neglect. In this case, nutrients can be put back into the soil to ensure healthy and productive plants.
Store bought fertilizers often have more ingredients than NPK, which are listed in the ingredient label, but those elements comprise a much smaller percentage. When reading the NPK number, pay attention to the ratio of the three numbers, remembering that the numbers refer to a percentage of the whole.. The highest number in the ratio is funneling nutrients to promote a specific type of growth. Here’s the breakdown:
Nitrogen- Involved in many processes, but plays a vital role in photosynthesis. Often associated with big leafy growth. If you have too much Nitrogen, plants can get strong foliage, but not flower or fruit. Lawn fertilizer (pictured below) is very Nitrogen heavy because foliage is the goal. That being said, if a lawn doesn’t have healthy roots, it won’t do well during dry spells or over the long run. Vegetable garden fertilizer does not need nearly as much Nitrogen. Some additional sources of Nitrogen are manure, compost, blood meal, and feather meal. Another popular method is called “cover cropping.” At Urban Harvest St. Louis, farmers use this technique by cutting legumes and clovers down at the base after harvesting, leaving the root structure to decay in the soil. The legumes then release Nitrogen into the soil through their root nodules. This helps to stabilize the Nitrogen level for other plants that come next in the growing season.
Phosphorous- Plays a role in many of the basic plant functions- root growth, structural strength, flower and seed production. Without Phosphorus, plants will not reach their potential. Phosphorus can be found in phosphate rock, manure, compost, blood meal, and bone meal.
Potassium- Referred to as “the quality element” because it contributes to size, shape, color, and taste. A plant with a potassium deficiency is stunted and has lower yields. Sources of potassium include manure, compost, wood ash, and potash.
While it may seem complicated, I have found it quite effective to apply a standard organic 10-10-10 fertilizer consistently through the growing season. This is in addition to a yearly application of compost. In my home garden setting, this seems to do the trick. Before I studied fertilizer, I simply added compost. One year my peppers flowered, but didn’t fruit. Now I know that was due to a Phosphorous deficiency! A friend of mine just started his first garden and his seedlings never got off the ground. He felt he was growing a miniature garden. It’s clear his soil most likely needs more of all three- NPK. So, you know what they say. If you want to have a veggie Partay, it’s N.P.K.!
Additional Resources
https://feeco.com/npk-fertilizer-what-is-it-and-how-does-it-work/
Worm Tea 101
Worm tea is delicious...for your plants! Learn how to prepare this natural liquid fertilizer from soaked worm castings. Filmed on location at the FOOD ROOF Farm.
Worm tea is delicious...for your plants! Learn how to prepare this natural liquid fertilizer from soaked worm castings. Filmed on location at the FOOD ROOF Farm.
Get Started: DIY Organic Fertilizers
The most important factor for healthy plant growth is healthy soil. As mentioned in Part 1, the key to building healthy soil is the regular addition of soil amendments like compost. If you are looking to replenish specific nutrients or to grow heavy feeders like tomatoes, you can make your own organic plant food at home. You need only apply small quantities when plants need it, rather than large amounts over the whole garden. Remember: LESS IS MORE when it comes to fertilizer. Read on for some low-cost or no-cost options for making your own gentle organic fertilizers at home.
The most important factor for healthy plant growth is healthy soil. As mentioned in Part 1, the key to building healthy soil is the regular addition of soil amendments like compost. If you are looking to replenish specific nutrients or to grow heavy feeders like tomatoes, you can make your own organic plant food at home. You need only apply small quantities when plants need it, rather than large amounts over the whole garden. Remember: LESS IS MORE when it comes to fertilizer.
Here are some low-cost or no-cost options for making your own gentle organic fertilizers at home.
Comfrey Liquid Fertilizer
Harvest a large bag of comfrey leaves. Be sure to wear gloves, as leaves can cause irritation.
Fill a large bucket or container with crushed leaves and weigh them down. Cover with a lid to contain the smell.
Leave for 2 weeks. The leaves will produce a dark concentrated liquid – drain this into a separate container and toss used leaves in the compost pile.
Mix 1 part comfrey concentrate with 15 parts rainwater (1:15) in a watering can and apply it to the soil at the base of your plants.
Nettle Tea
Stinging nettles are common plants (even considered weeds!) that can be steeped to create a liquid nitrogen fertilizer.
Using gloves (plants will sting), cut leaves and stems at the base (do not include the roots) and fold, chop, or crush them into a bucket.
Fill the bucket with rainwater and cover and place in a warm sunny spot.
Check every 2 days to stir the tea. Foam on the top is normal.
The tea will take 2 weeks in a warm location, and up to 3 in a cool or shady spot. You can strain the tea into a new container through a cheesecloth or scoop the plant parts out of the liquid and add to the compost pile.
To use, mix 1 part nettle tea with 10 parts water (1:10) poured at the base of plants
(Note: You will still need to use compost to get the most out of this fertilizer. It is not meant for beans, peas, onions, potatoes and root vegetables).
Quick Fix Fertilizer Recipe:
In a 1 gallon container, add
1 tsp baking powder
1 tsp ammonia (quick nitrogen),
3 tsp instant iced tea (tannic acid),
3 tsp blackstrap molasses (feeds soil bacteria)
3 tbsp of 3% hydrogen peroxide (oxidizer)
1/4 C crushed bone scraps (phosphorus—fish bones provide potassium)
1 crushed eggshell (calcium & potassium)
1/2 dried banana peel (potassium)
Fill the jug the rest of the way with water (rainwater is best)
Replace cap and allow the jug to sit in the sun for about 1 hour to warm.
Water your plants with this mixture at full strength.
Kitchen Waste
These are some common outputs from a kitchen that many home gardeners have adapted to feed their plants. There are many “myths” about these materials, however, they may be used as below:
Spent Coffee Grounds: Often applied to acidic-soil loving plants like berries or azaleas. Grounds are high in nitrogen, but there is debate among growers if they are beneficial when directly applied to vegetable beds. Due to their residual caffeine and high nitrogen content, they are probably most effective for adding to a compost pile with a lot of woody/brown materials to create a balanced compost.
Eggshell: High in calcium, egg shells can balance oil acidity and assist with nutrient uptake. Egg shells decompose very slowly, however; therefore, they should be pulverized with a mixer, grinder, or mortar and pestle before you add them to soil or compost. You can steep dried eggshells in water for a few days and use them on both indoor and outdoor plants for a calcium boost.
FOOD FOR THOUGHT
Can you skip fertilizer altogether? This home gardener explains why he never uses fertilizer and gets results without it.
REFERENCES
Vegetable Garden Fertilizer 101
Feeding Your Plants for Free - How to Make Fertilizer for Your Vegetable Garden
Get Started: Why Fertilize?
All plants need light, water, and nutrients to thrive. Fertilizers can contribute nutrients to plant health, but a general rule of thumb is LESS is MORE. Heavy feeders like tomatoes often need additional nutrients that organic fertilizer can supplement; however, fertilizing is not the solution for most problems you encounter. Plants will only absorb the nutrients they require, and over-fertilizing can lead to wasted effort and a build-up of chemicals in your soil.
All plants need light, water, and nutrients to thrive. Fertilizers can contribute nutrients to plant health, but a general rule of thumb is LESS is MORE. Heavy feeders like tomatoes often need additional nutrients that organic fertilizer can supplement; however, fertilizing is not the solution for most problems you encounter. Plants will only absorb the nutrients they require, and over-fertilizing can lead to wasted effort and a build-up of chemicals in your soil.
GARDEN AMENDMENTS
Worm castings
Soil amendments improve your soil’s nutrition and organic content, while fertilizers have specific nutrients to “feed” your plants. Most home vegetable gardens can avoid expensive fertilizers and focus on adding all-purpose organic material to soil to improve overall soil health and structure. Popular amendments include aged animal manures, worm castings, liquid fish emulsion, fall leaves, compost, perlite, straw, gypsum, and cover crops.
In general, you should add 2 inches of compost or aged manure on top of your garden beds and containers at the start of each year. Throughout the growing season, add a scoop of compost next to your seedlings and young plants periodically – a process known as side-dressing. You do not need to till or mix the compost into the soil; rain will saturate the top layer so that nutrients get absorbed.
WHEN TO USE FERTILIZER
Before you resort to fertilizer to help a struggling plant, review other factors: is the plant in a shady area and need more sun? Is the soil waterlogged or overly dry? Is your soil compacted or lacking adequate organic material? Are you dealing with pests or other pathogens? Is your soil’s pH out of balance?
If you are applying compost or amendments to your beds each year, you will need little to no fertilizer. In specific cases – such as when your plant is fruiting or if you are doing container gardening – some fertilizer may be helpful. Add a moderate amount of fertilizer when you transplant seedlings, early on in their growth. Organic fertilizers are slower-acting and gentler than chemical fertilizers and more appropriate to home vegetable gardening. Never add lawn fertilizer to your garden beds; the high nitrogen content will burn roots and cause imbalances in your soil.
FERTILIZER COMPOSITION
Commercial fertilizers are concentrated combinations of nutrients that are added to the soil to stimulate plant growth. Fertilizer labels include an N-P-K ratio that describes the percentage of (N) Nitrogen, (P) Phosphorus, and (K) Potassium (or Potash). For example, the label 5-3-2 indicates 5 parts nitrogen, 3 parts phosphorus, 2 parts potassium.
These are the 3 main elements that plants require to grow. Nitrogen is used in green plant growth, such as stems, roots, and leafy growth. Phosphorus is useful for strong roots and shoots, and potassium is essential for flowering and hardiness. Avoid high balanced ratios like 10-10-10 (often seen in lawn fertilizer), as this will do more damage than good. An ideal ratio for vegetables is 3-1-2.
Get Started: Worm Composting (Vermicompost 101)
Also known as vermicomposting, this technique uses an ecosystem of earthworms and microbes to break down organic material into a natural fertilizer called worm castings. Gardeners consider this to be “black gold” because castings have very high levels of microbial activity that enriches soil and promotes water retention.
WHAT IS WORM COMPOST?
Also known as vermicomposting, this technique uses an ecosystem of earthworms and microbes to break down organic material into a natural fertilizer called worm castings. Gardeners consider this to be “black gold” because castings have very high levels of microbial activity that enriches soil and promotes water retention. The most popular type of composting worms are called Red Wigglers. This is not the same species of earthworm that you find in your garden soil. They can tolerate a range of environments and are very efficient converters of organic material. At least 1 lb (approx 1000 worms) is recommended for starting a home system. A worm bin is one of the most efficient methods available for composting indoors!
How to build your urban worm bag.
OPTIONS FOR YOUR WORM BAG/BIN
DIY Plastic Tub: This requires a sturdy plastic (10 gallon) tub with holes drilled in the side and bottom for airflow. An option with this design is to “stack” one tub (with holes in the bottom for drainage) into another tub to catch excess moisture. To harvest finished compost, the worms must be separated from castings manually.
Stacking System: This is a popular alternative to the single bin because it avoids water-logged compost and the task of separating finished castings. These stacked bins are made of nesting trays that are placed on top of each other in a vertical tower. The trays have holes or mesh on the bottom, which allows worms to migrate upward when the food and bedding in the lower tray has been converted to castings.
Continuous Flow System: A single container that provides continuous finished castings without disturbing the worms. Food scraps and bedding are replenished on top of the system while the finished castings are removed from the bottom. Worms will naturally migrate to the upper 6 inches of the system where the food is plentiful, leaving their castings below for you to use. This is the design used by the Urban Worm Bag featured in our video tutorial.
Setting up the environment for your worm bed.
CREATING THE RIGHT ENVIRONMENT FOR YOUR BIN
Bedding materials: Popular options include coco coir, aged (not fresh!) horse manure, dry leaves, mature/finished compost, shredded paper and cardboard products including toilet paper rolls, paper egg cartons, and any newsprint that isn’t glossy or colored ink. Remember that the worms will also consume/convert their bedding so you do not want to add anything toxic or inorganic to the mix.
Microbes: A crucial part of the vermicomposting team! Microorganisms break down food scraps prior to worms consuming them. Add a scoop of compost when you start your bin to kickstart microbial activity. If you don’t have finished compost, a scoop of garden topsoil is an excellent alternative.
Moisture: Ideal moisture content is about 60%. The simplest way to determine if your bin is in this range is to squeeze a handful of your compost. You should get 1 drop of water. If the castings are crumbly, the bin is too dry, and you can add more food or water (use mist or spray bottle only). If you get more than 1 drop of water or it’s “muddy,” it is too wet. Add bedding and stop feeding for a period of time.
Temperature: Unlike an outdoor compost bin, the microbes in your worm bin do not need hot temperatures. In fact, the right temperature range in your bin is 40-85° Fahrenheit, but does best at 60-75 ℉. Overfeeding leads to overheating!
pH: This should be neutral to slightly acidic. You can maintain this balance by adding fresh bedding with food scraps. Only add moderate amounts of acidic foods like berries or citrus. Occasionally adding ground egg shells will also help counteract the acidity of food scraps (and the grit is good for worm digestion!)
FEEDING YOUR WORMS
Adding your worms
Feeding your worms
Suitable worm food: Worms can eat most fruit and vegetable scraps, grains such as plain rice and oatmeal, coffee grounds, crushed egg shells, pulp from a juicer, small amounts of bread, and used tea bags. Worms will process shredded or cut up food more quickly and love food that microbes have already started to consume. You can leave food scraps in a container for a few days before adding to the bin. Do you have some veggies in your fridge that are slightly mushy, or brown bananas? This is perfect worm food!
Unsuitable foods: Do not feed your worms butter, meat, dairy, bones, oils, salty foods, grass clippings, citrus, onions, hot pepper, spicy food, pickles or vinegar, pasta, wood ash, and pet feces. Worms do not process these foods well, so they may be left to rot and create odor or breed undesirable bacteria in the bin.
Frequency: Add 25-33% of the weight of your worms every 3 days and observe if the worms finish processing that food before adding fresh scraps. If you see rotting food on top of the bin, they are not consuming it quickly enough and you should add less food.
Rough guideline for volume conversion of food waste: 1 lb ≅ 4 cups or 1 qt.
Overfeeding: This is the most common error that beginners make. Is your bin too wet or too hot? Does it have an unpleasant odor? You are overfeeding! Add dry bedding and stop feeding until conditions stabilize.
FINISHED WORM CASTINGS
Most vermicompost systems will produce usable worm castings in 8-12 weeks, which is quicker than traditional composting. Finished vermicompost is dark, earthy smelling and moist but not soaking.
Castings can be added directly into a potting mix or used to “side dress” your plants and seedlings!
ADDITIONAL RESOURCES
Composting Inside and Out: 14 Methods to Fit your Lifestyle by S. Davies
Worms Eat my Garbage: How to Set up and Maintain a Worm Composting System by M. Appelhof and J. Olszewski
Composting with Worms: Don’t make these 5 Mistakes (Uncle Jim’s Worm Farm)
How to Start and Maintain your Worm Bin (Urban Worm Company)
The Ultimate Guide to Composting (Simple Grow Soil)
