Get Started: Building your Garden’s Tool Kit
These simple steps will help keep your tools in good shape and last longer. It is important to clean and sanitize tools that have been used on sick plants to prevent the spread of diseases to healthy plants. Sharp tools are safer to use and make cleaner cuts that avoid damaging plants and making them susceptible to pests or disease.
RECOMMENDED TOOLS

Gloves
Garden Hose
Spray Nozzle / Watering Wand (*breaks up water, adjustable force)
Hand Trowel
Hand Cultivator
Hand Pruner
Watering can (*indoor and patio containers)
Loppers (*pruning thicker branches >1” diameter)
Digging Fork
Garden Spade (*sharp square shovel for digging holes)
Rake (*for leaf debris)
Wheelbarrow (*for moving compost and mulch)
TOOL CARE
These simple steps will help keep your tools in good shape and last longer. It is important to clean and sanitize tools that have been used on sick plants to prevent the spread of diseases to healthy plants. Sharp tools are safer to use and make cleaner cuts that avoid damaging plants and making them susceptible to pests or disease.
DAILY MAINTENANCE
Rinse digging tools and remove caked-on dirt with a stiff brush or scrubbing pad
Rinse and scrub garden shears or pruners with soapy water. Use a foaming bathroom cleaner and let sit before scrubbing. Make sure tools are completely dry before storing them.
Store tools in a dry, well-ventilated shed or garage. Large tools should be hung upside down so as not to dull their blades and be kept off of floors to control moisture (and rust)
SEASONAL TASKS
Removing Rust: To prevent rust, make sure that your tools are dry before you store them. Rubbing linseed or mineral oil onto the tool will also help prevent rust. If rust has already occurred, there are still a few options:
Mix a 1:1 ratio of water and vinegar, and soak tools overnight
In the morning, use steel wool to scrub in a circular motion
Wash with soapy water and rinse thoroughly
Once dry, you may also rub the tool with linseed or mineral oil (always wait 24 hours after applying oil before using tools to prevent solvent contamination)
Cleaning garden blades: Before winter storage, bladed tools like pruners or loppers should be sanitized and sharpened.
Use rust prevention directions above
Keep tools sharp with a pruner-sharpening tool, file, or stone.
Push the sharpener in the same direction (not back and forth) across the blade and follow the original bevel angle.
For damaged blades or expensive tools, professional sharpening is an option - Jansen Sharpening is a St. Louis based business that specializes in sharpening and blade repair.
Wood handle care:
At the end of the year, you can lightly sand and apply linseed oil to condition handles
Large cracks mean that the handle may have to be replaced, but small splinters may be sanded down safely.
You can also find a helpful YouTube video tutorial on caring for your tools here.
SAFETY NOTES
Do not wad up oil-soaked rags, especially those soaked with linseed oil, or put them in an enclosed container as there is combustion risk. Let them air dry between uses.
Wear eye protection and heavy gloves when using any sharpening equipment to protect against metal slivers.
ADDITIONAL RESOURCES
A Beginner’s Guide to Comfrey & Echinacea for Gardening and Healing
By Shannon Haubrich, Leadership in Urban Agriculture Internship, Summer III 2020
COMFREY

(Symphytum officinale)
Native to Europe, western Asia
Perennial
Comfrey digs very deep roots which absorb and redistribute nutrients in soil, which makes it an incredible ‘chop and drop’ fertilizer. It shades surrounding plants, acting as a living mulch, and when chopped, the plant breaks down, adding the absorbed nutrients back into the soil. Comfrey attracts pollinators, too!
MEDICINAL USES
Encourages wound healing
Diminishes scarring
Relieves arthritis and general muscle/joint pain
Provides healing for digestive ulcers
Eyewash for irritated eyes
*Take caution and research before using topically on an open wound or ingesting! Comfrey may re-bind skin and tissue too quickly, or seal in existing infection. It is also argued that comfrey, when ingested, can be harmful to the liver. Many people ingest comfrey in small amounts, but do plenty of research and ingest only if you feel safe.
COMFREY OIL RECIPE
Harvest comfrey leaves and allow them to dry overnight or in a dehydrator. Fill a glass jar halfway with the leaves, then cover with good-quality oil (cold-processed olive and/or coconut oils work well). Cover tightly, and let sit 4-6 weeks, occasionally giving the jar a light swirl/stir. After 4-6 weeks, strain out the herbs, and use the oil for topical application of comfrey as needed.
ECHINACEA

(two common species are E. purpurea & E. angustifolia)
Native to North America
Perennial
Echinacea grows abundantly in Missouri! It attracts many pollinators like butterflies, predatory wasps, and pollinating flies, making it a great companion for certain vegetables like tomatoes and peppers. Echinacea is also known to attract the goldfinch, which is lovely to see and friendly to garden fertilization.
MEDICINAL USES
Healing for wounds, bites, and stings
Immune support (take with raw, organic garlic for a powerful kick to viral infections)
Strengthens and clears lymph nodes
Powerful against infections, internal or external (i.e. bladder, ear)
Can be used as a pain reliever (Echinacea’s numbing effect makes it useful for dental pain)
ECHINACEA TEA RECIPE
Harvest any leaves, flowers, or roots you’d like to use in your tea (or use dried, store-bought echinacea). Boil water, pour over echinacea, and let steep for 15 minutes. This long steep time allows the medicinal properties to be extracted, especially from the plant’s thick roots.
How to Make a Milk Crate Garden
Follow these simple steps to make your own milk crate garden!
By Natalie Fabbri, Leadership in Urban Agriculture Internship, Summer III 2020
Click on the image for a PDF version of the guide.

Container Gardening 101
Save space and maximize plant growth with these container gardening tips!
Save space and maximize plant growth with these container gardening tips!
Get Started: Building Healthy Soil
Regenerative Agriculture is at the forefront of sustainability and climate resiliency in our food system. This is a set of principles and practices based on restoring our soils, watersheds, and biodiversity in our ecosystems. These practices also capture carbon in soil to mitigate atmospheric carbon and build resilience to climate change.
Regenerative Agriculture is at the forefront of sustainability and climate resiliency in our food system. This is a set of principles and practices based on restoring our soils, watersheds, and biodiversity in our ecosystems. These practices also capture carbon in soil to mitigate atmospheric carbon and build resilience to climate change.
REGENERATIVE HOME GARDENING
Although large scale agricultural projects can implement a number of different pasture and farming practices under this method, the most relevant techniques for home and community gardeners include:
No-till Gardening
Compost and Soil Amendments
In particular, both of these practices contribute to healthy and fertile soil.
SOIL FOOD WEB ILLUSTRATED

WHAT MAKES SOIL “HEALTHY” OR “UNHEALTHY”?
We can measure soil “health” in the diversity of organisms that make up the Soil Food Web and the soil’s ability to function as a complex living system. This ecosystem is able to effectively recycle nutrients and elements from decaying organic matter to feed new life.
“Unhealthy” soil is lacking organic matter and the ecosystem that it sustains, which makes life’s building blocks (nitrogen, carbon, phosphorus, potassium, and trace elements) less accessible for plant growth. Industrialized agriculture typically relies on synthetic chemical fertilizers in place of organic matter and its nutrient cycle. This depleted food web renders the productivity of the soil dependent on continued fertilizer application. The chemical runoff that occurs with rain events contaminates our waterways and contributes to“Dead zones” in our oceans. The cycle of soil and water health is connected on a global scale.
Even on a small scale, however, you can be part of the solution. The benefits of healthy soil in your garden include:
Disease and pest resistance in plants
Robust root and plant growth
Thriving pollinator populations
METHODS TO RESTORE SOIL HEALTH
Compost: This term refers to both the process of decomposition of organic materials and the finished product. It requires oxygen and relies on microbes and invertebrates to break down organic matter. Compost is a rich dark brown color, with a sweet earthy smell, and is free from large chunks of organic matter.
Compost is a crucial “soil amendment,” because it is added to soil to boost microbial life (food web), organic structure, and nutrient absorption by plants
Popular options for DIY composting include: “hot compost” outdoor pile, “in-vessel” rotating bin, worm compost, and bokashi buckets (indoor)
“No-Till” or No-Dig Gardening: This approach avoids deep digging, tilling, or turning over topsoil, which disrupts the soil food web ecosystem.
Amendments like compost, lime, fertilizer, etc, are simply added to the surface of the soil. This mimics how soil is formed in nature and retains its healthy spongy texture
Extensive mulching and use of cover crops or “green manure” replaces the task of weeding
Promotes aeration of soil and supports earthworm populations: remember “If you build it, they will come!” A robust food web will naturally attract worms and nature’s other recyclers into your garden.
Beginner's Guide to Permaculture and Home Gardening
Collectively realizing ecological and food justice can and will start small, especially through the bioregional practice of integrating permaculture principles into home gardening.
By Liz Burkemper, Leadership in Urban Agriculture Internship, Summer II 2020

Collectively realizing ecological and food justice can and will start small, especially through the bioregional practice of integrating permaculture principles into home gardening.
To live bioregionally means to live in place: we are cognizant and contemplative of the ecological needs of our places, whether terrestrially or communally. We nourish Earth instead of stripping it down, we grow and eat in awareness of the natural ecosystems and natively thriving plants, we grow with the Earth instead of against it, we abide with our community rather than separately from it.
Our home gardens are perfect grounds for beginning to do so toward listening to the Earth and nourishing our (and our community’s) body. Through the practice of permaculture, we might thoroughly enjoy the Earth’s fruits—grown in harmony rather than in opposition—and what we don’t enjoy, we give away to our neighbors and back to the soil.
Some tips on bringing permaculture to your backyard/home garden:
1. Grow your soil! Instead of tilling, feed your garden beds—layer with cardboard or leaves/grass clippings from your yard. Through permaculture, we learn that every part of the life cycle is useful, and that soil is living, so we must nourish it instead of snuffing out its natural vitality.
2. Grow perennials! Unlike annual-only plants, perennials—especially when planted polyculturally so as to balance the garden ecosystem—won’t zap the soil nutrients + don’t need to start from seed over and over again. Think kale, garlic, rhubarb, chives, asparagus, artichokes!
a. Don’t forget: “perennial” does not mean “no tending required”!
b. Since perennials grow differently than many crops favored by modern industrial agriculture, many of these plants have been lost to history or are rarely found in the grocery store. Don’t be afraid to try veggies you have never tasted before!
3. Mulch mulch mulch! Mulch is the ultimate soil protector—from dryness + erosion, of essential microorganisms and insects, of soil moisture. Here’s an easy guide to permaculture mulching in your garden.
a. Use organic materials from your own lawn: grass clippings, leaves, pine needles, fallen branches, twigs, bark, (sometimes) rocks...
b. ...or find local byproducts (which are often free): grain husks, sawdust, woodchips c. Make a layer that’s three inches thick, and do it again!
4. Build a creative (i.e. no-row) space! Gardening and farming through plowed rows resists the natural thriving of plants, even visually—planted rows mean empty rows between them. Instead, mix your tall + short plants, let vines grow upwards on corn stalks, and plant with curves so as to use your garden space wisely and ensure healthy microclimates for your plants.
a. Unconvinced of the rad benefits of row-less gardening? Check out this deep dive into the advantages for small-scale gardeners!
b. Used on the Urban Harvest STL farms, raised rows are another low-maintenance, no-till means of building up your garden.
5. Don’t waste! Permaculture thrives on a closed-loop system: all waste (output) is reintegrated as resources (input) so as to ensure the dynamism and energy efficiency of the growing system. This means harvesting seeds, using weeds to rebuild the soil, composting, and more.
These are just some beginner’s tips! At the heart of permaculture and bioregionalism is listening and paying attention to the land on which we live, instead of forcing our own thoughts and desires onto the land or into our communities. This listening can be practiced anywhere and everywhere.
For more diving and digging, check out Deep Green Permaculture’s guide to starting your own permaculture garden + Permaculture News’ guide to doing so small-space intensively.
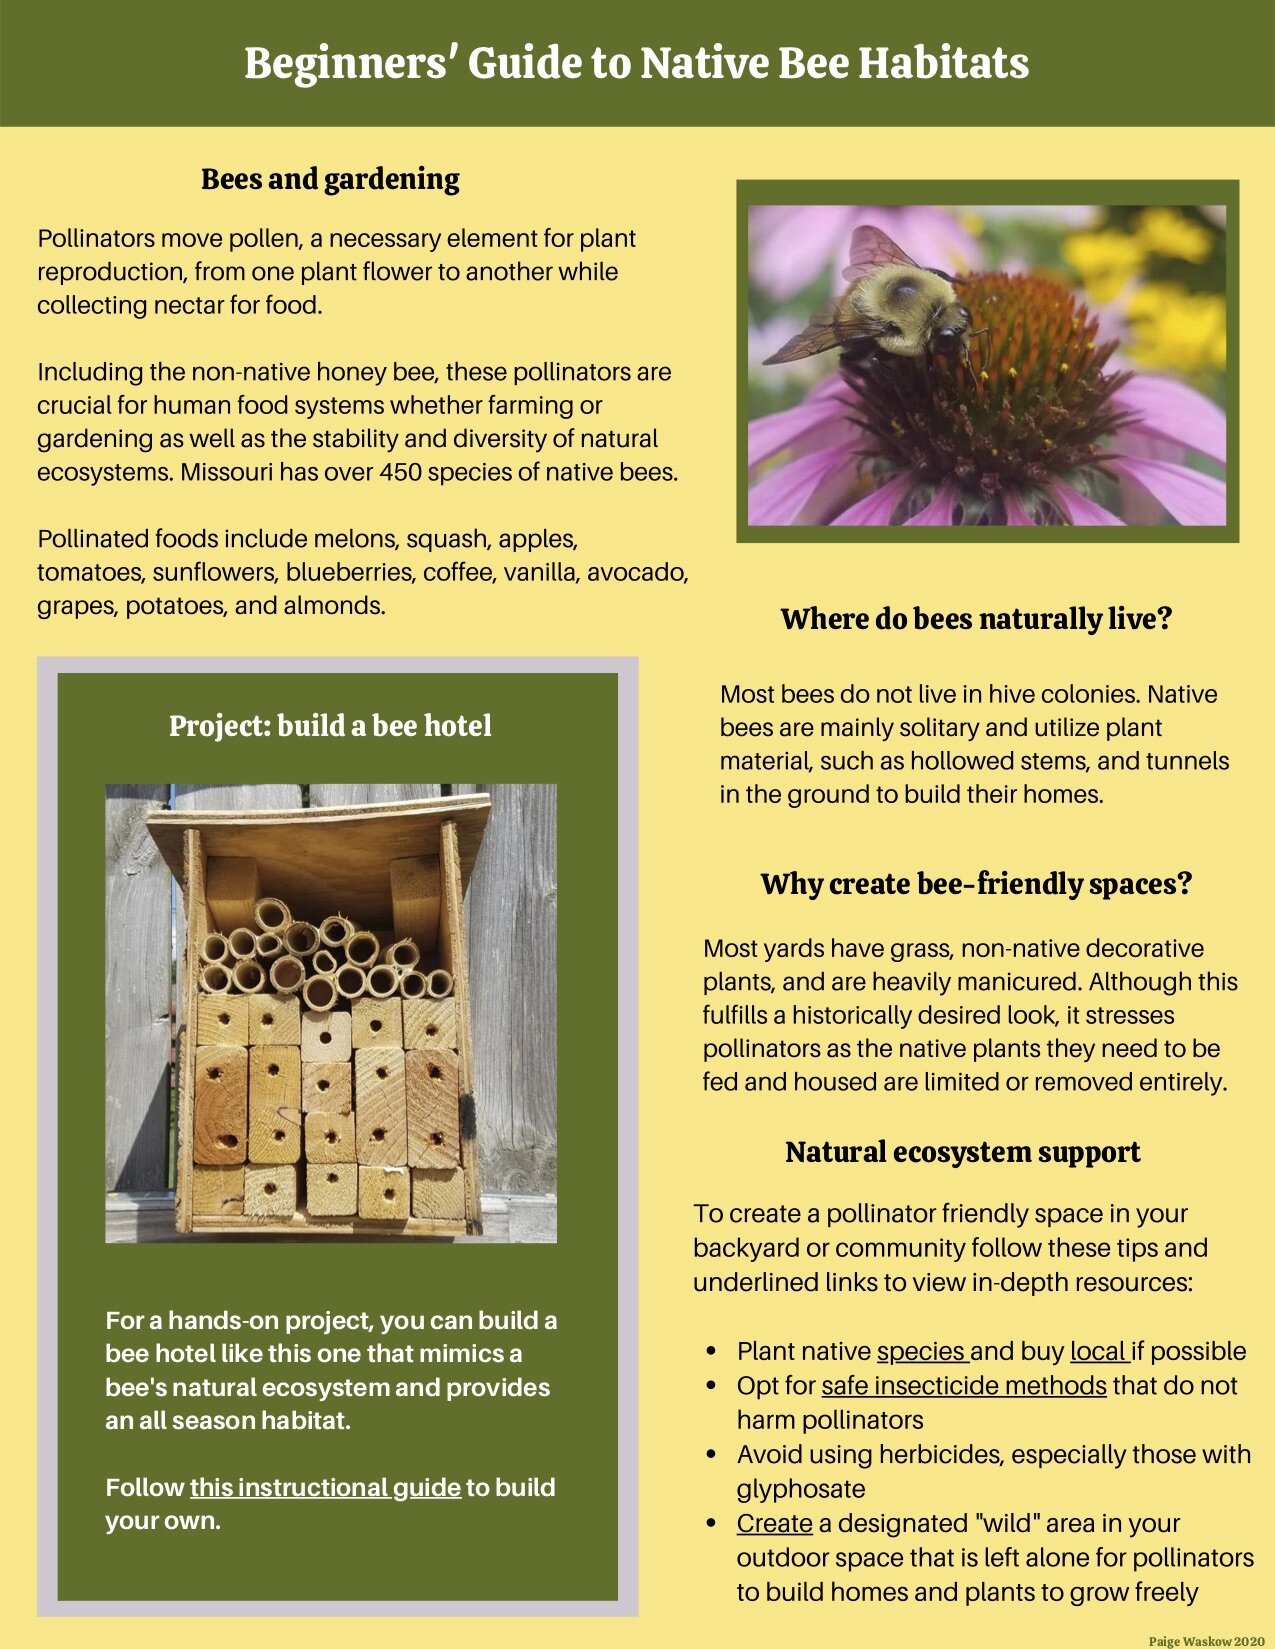
Beginner's Guide to Native Bee Habitats
Learn about the benefits of planting native flowers and some common examples!
By Paige Waskow, Leadership in Urban Agriculture Internship, Summer I 2020
Click on the image for a PDF version of the guide.
Food Preservation Through a Culinary Justice Lens
Learn the basics of culinary justice, why it matters to urban growers, and some simple preservation methods to try yourself.
By Briana Robles, Leadership in Urban Agriculture Internship, Summer II 2020

Photo by Soul Fire Farm.
Introduction to Culinary Justice
Co-executive director of Soul Fire Farm and author of Farming While Black, Leah Penniman, eloquently stated that “our tables are healing tables, fellowship tables, and living history tables.” Likewise, our tables are also rooted in food apartheid, which presents itself in statistics such as “1 in 4 black children go to bed hungry” and the common illusion that “healthy cooking and food preservation is a ‘white people thing.’” Michael Twitty, Culinary Historian and author of The Cooking Gene, defines culinary justice as “the idea that oppressed peoples have the right to not only be recognized for their gastronomic contributions, but they have the right to their inherent value… to derive from them, uplift and empowerment.”
Why Culinary Justice Matters to urban growers
As gardeners, farmers, and foodies, we participate with the food system in inherently distinct ways. Growing, preserving, cooking, and feasting are ways of honoring generational wisdom and living sustainably for the sake of those who will come after us. Chef Kabui, a Kenyan chef committed to decolonizing our food, reminds us that “everyone has a farming history in growing and preparing food. So, find it. Connect with it- with that ancestor. Carry it on.” Growing food invites us to grow in awareness of our land, ourselves, and one another.
Basic Methods of Food Preservation
Farming While Black mentions various methods for cooking and preserving the food we grow including, preserving in soil and ash, Drying, Fermentation, In-Vinegar, Canning, and Freezing. Below, Fermentation and In-Vinegar food preservation techniques will be discussed, and example recipes will be provided. To learn more about other indigenous ways of preserving food from around the world, click here.
PRESERVATION BY FERMENTATION
Fermentation is a method of food preservation used throughout the world that increases the nutritional content of food with the help of bacteria.
Veggies that are great candidates for beginner lactic acid fermentation include:
Cabbage (below)
Turnips
Carrots
Cucumbers
Radishes
Green beans

Photo by Emet Vitale-Penniman for Farming While Black.
HOW TO MAKE FERMENTED CABBAGE
Recipe adapted from Farming While Black by Leah Penniman
Slice cabbage thinly
Combine with non-iodized sea salt at a ratio of 1-pound vegetable to 1-teaspoon salt.
Use your hands to massage the salt into the cabbage
Let it sit in brine while you sterilize the canning jars* in boiling water
*NOTE: Standard quart-sized canning jars holds about 2 pounds of vegetable
Pack brined cabbage tightly into jars pressing out air as you go, so that the cabbage fills the jar up to the bottom of the rim
Pour liquid brine over cabbage to completely fill jar
Place lid on loosely
Arrange jars on tray/pan/dish & place at room temperature* for 3 days
*NOTE: The hard-working bacteria will result in bubbling and loss of liquid
Top off each jar with brine solution of 1-teaspoon of salt per 4 cups of water
Secure lids on tightly & transfer to cool/ dark refrigerator or basement
Bonus: Recipe can be jazzed up using garlic, dill, mustard seeds, caraway seeds, juniper berries, & other spices.
PRESERVATION IN VINEGAR
In about 2030 B.C, vinegar was first documented for the preservation of cucumbers in Mesopotamia near the Tigris River. Below, is a recipe for Pikliz, a sour & spicy staple in creole cuisine and every Haitian household.

Photo by Andrew Scrivani for The New York Times.
HOW TO MAKE PIKLIZ
Recipe adapted from Farming While Black by Leah Penniman
Thinly chop cabbage, carrots, & onions
Pack into clean jar
Add distilled vinegar to just cover the mixture
Add spices: thyme, whole cloves, lime juice, salt, & hot peppers
Cover with lid and shake
Allow to sit at room temperature for 3 days before consuming
*NOTE: Always use a clean spoon every time you add Pikliz to your meal
Bonus: Experiment by adding other veggies including, cucumber, sweet peppers, turnips, cooked beets, green peas, fennel, radish, cauliflower, green beans, & boiled eggs.
Additional Resources you might be interested in…
To learn more about Karen Washington, who coined the term “food apartheid”, click here.
To watch a short video by Michael Twitty on Culinary Justice, click here.
To read an interview with Sioux Chef Oglala Lakota about decolonizing our diet, click here.
Works Cited
Andrew Scrivani. “Pikliz”. To view, https://cooking.nytimes.com/recipes/1017277-pikliz.
Ecks Ecks. "Cabbage". Licensed under CC BY-NC-ND 2.0. To view a copy of this license, visit https://creativecommons.org/licenses/by-nc-nd/2.0/.
Penniman, Leah, and Karen Washington. Farming While Black: Soul Fire Farm's Practical Guide to Liberation on the Land. Chelsea Green Publishing, 2018.
Twitty, Michael. “Gastronomy and the social justice reality of food”. YouTube, uploaded by TED Archives, 20, Dec. 2016. https://youtu.be/8MElzoJ2L6U.
Vitale-Penniman, Emet. The author grates cabbage on a mandolin as an initial step in fermentation. 2018. Photograph. Farming While Black: Soul Fire Farm's Practical Guide to Liberation on the Land. Whit River City Junction, Vermont: Chelsea Green Publishing, 2018. 239. Print.
Beginner’s Guide to Reading a Fertilizer Label
Confused about the numbers on the outside of a fertilizer bag? Not sure which one to purchase? This helpful guide breaks it down!
By Melanie Moser, Leadership in Urban Agriculture Internship, Summer I 2020

When farming, it’s vital to know what nutrients different plants need to thrive. All plants need three main elements to grow to their full potential- Nitrogen (N), Phosphorous (P), and Potassium (K). Fertilizer bags list these three ingredients prominently on the label with three numbers. For example, a fertilizer with an NPK number of 10-10-10 has equal parts Nitrogen, Phosphorous, and Potassium. Each of these elements are used by the plant in different ways, which will be discussed in depth below. But if your plants are underproducing or unhealthy, employing fertilizer could be just what the gardener ordered!
Soils (urban or otherwise) frequently lack these three important nutrients. But urban farmers need to pay special attention to fertilizing. In the urban setting, farmers are often bringing in soil ingredients or building garden beds from scratch. The soil in a city plot may be particularly devoid of nutrients due to pollutants, overdevelopment, or neglect. In this case, nutrients can be put back into the soil to ensure healthy and productive plants.
Store bought fertilizers often have more ingredients than NPK, which are listed in the ingredient label, but those elements comprise a much smaller percentage. When reading the NPK number, pay attention to the ratio of the three numbers, remembering that the numbers refer to a percentage of the whole.. The highest number in the ratio is funneling nutrients to promote a specific type of growth. Here’s the breakdown:

Nitrogen- Involved in many processes, but plays a vital role in photosynthesis. Often associated with big leafy growth. If you have too much Nitrogen, plants can get strong foliage, but not flower or fruit. Lawn fertilizer (pictured below) is very Nitrogen heavy because foliage is the goal. That being said, if a lawn doesn’t have healthy roots, it won’t do well during dry spells or over the long run. Vegetable garden fertilizer does not need nearly as much Nitrogen. Some additional sources of Nitrogen are manure, compost, blood meal, and feather meal. Another popular method is called “cover cropping.” At Urban Harvest St. Louis, farmers use this technique by cutting legumes and clovers down at the base after harvesting, leaving the root structure to decay in the soil. The legumes then release Nitrogen into the soil through their root nodules. This helps to stabilize the Nitrogen level for other plants that come next in the growing season.
Phosphorous- Plays a role in many of the basic plant functions- root growth, structural strength, flower and seed production. Without Phosphorus, plants will not reach their potential. Phosphorus can be found in phosphate rock, manure, compost, blood meal, and bone meal.
Potassium- Referred to as “the quality element” because it contributes to size, shape, color, and taste. A plant with a potassium deficiency is stunted and has lower yields. Sources of potassium include manure, compost, wood ash, and potash.
While it may seem complicated, I have found it quite effective to apply a standard organic 10-10-10 fertilizer consistently through the growing season. This is in addition to a yearly application of compost. In my home garden setting, this seems to do the trick. Before I studied fertilizer, I simply added compost. One year my peppers flowered, but didn’t fruit. Now I know that was due to a Phosphorous deficiency! A friend of mine just started his first garden and his seedlings never got off the ground. He felt he was growing a miniature garden. It’s clear his soil most likely needs more of all three- NPK. So, you know what they say. If you want to have a veggie Partay, it’s N.P.K.!
Additional Resources
https://feeco.com/npk-fertilizer-what-is-it-and-how-does-it-work/
A Brief Guide to Native Planting in Missouri
Learn about the benefits of planting native flowers and some common examples!
By Carrie Phillips, Leadership in Urban Agriculture Internship, Summer I 2020
Click on the image for a PDF version of the guide.
